How to make pants one size smaller at the waist and sides
Sewing pants at home is easy. Even a beginner with minimal sewing experience can handle this job. The main thing is to be patient and carefully follow everything step by step, following the instructions.

How to sew in the sides of pants?
Before you start altering your trousers, you need to pay attention to the characteristics of the material:
- compound,
- elasticity,
- strength,
- thickness.
Even an experienced craftswoman will not always accurately alter or tighten a product made of knitwear, silk, polyester or other materials difficult to sew.
Then you need to prepare everything you need for work:
- scissors;
- a needle;
- durable cotton threads of a suitable color;
- basting pins;
- chalk or piece of soap.
It’s good if the household has at least the simplest sewing machine. But you can do without this useful device and sew the seams manually.
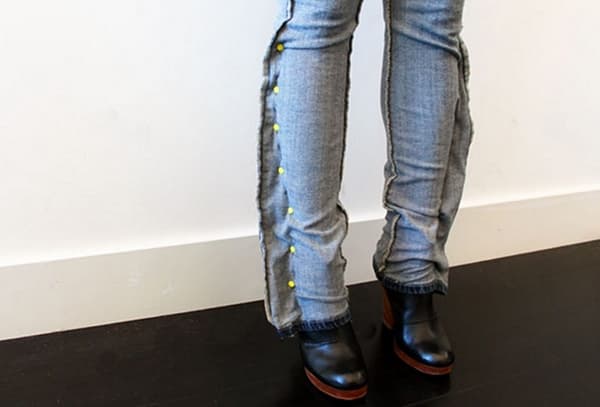
If the trousers are not very large, then the legs can be sewn in only one seam - external or internal. To reduce a product by two or three sizes, you will have to use both seams.
The work is carried out in several stages:
- The product is turned inside out and tried on.
- Standing in front of a mirror, use basting pins to pinch off excess material on the sides.
- They take off their trousers, lay them out on a flat surface and, using pins as a guide, draw a line with chalk. This will be the line of the new seam.
- Place the seams on the sides using large stitches and try them on again.To make sure that the pants do not become too tight, you need to make some movements: sit down, bend over, walk around.
- Sew along the intended line, trying to keep the stitches short, as when sewing with a machine.
- Turn the product right side out and try it on again.
- If the trousers fit properly, you can open the factory seam and trim off the excess material, leaving 1.5 cm from the new stitch. The cut edge must be processed with an overcast stitch, otherwise the fabric will crumble.
- To complete the work, the seams are steamed from the inside and outside through a piece of cotton fabric.
Sometimes there are trouser products with decorative stitching along the outside of the leg. In such situations, in order not to spoil the appearance of the clothing, it is better to redo the inner seam. In any case, only one of the seams can be adjusted if the volume is reduced by 1-1.5 cm and no more. Otherwise, the pant leg will warp and the product will be damaged.
Sewing trousers in a belt
It happens that pants fit perfectly on the hips, but bulge at the waist. This problem can also be quickly dealt with at home, without the involvement of professionals, although you will have to tinker quite a bit. The work can be done in one of two ways: add additional darts in the upper part of the trousers or sew in the back seam.
Method 1. Creating darts.
- Rip off the belt and belt loops (if provided).
- The upper part of the pants is smoothed with an iron, the product is turned inside out and tried on. You need to find out how many centimeters you need to reduce your trousers at the waist.
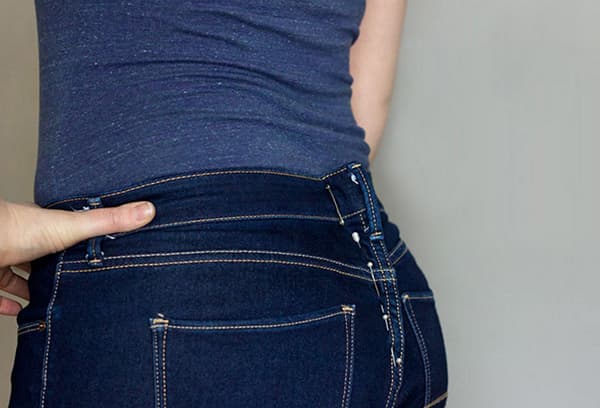
- Excess material is placed in the darts and pinned with a pin. Darts should be symmetrical and located at equal distances from the seams. It is better to make four small darts - two in front and two in back.
- Using a ruler, mark the line of the future dart with chalk and stitch it with a “machine” seam.
- The length of the belt will also have to be reduced. To do this, the part is cut so that the seam is on the back or side, the extra centimeters are removed and stitched.
All that remains is to sew the belt in place, iron it thoroughly and try on the updated product.
Method 2: Deepening the back seam.
- The belt is peeled off along with additional elements (loop loops, leather labels).
- Try on the product, turning it inside out. The extra centimeters of material are collected in the area of the middle seam of the back half of the trousers and pinned with a pin.
- Using a ruler, mark the line of the new seam. The main thing is that there is no corner at the junction of the old and new seams, otherwise the fabric will bulge greatly in this place.
- Sew the parts along the line with a machine stitch, trim off the excess material and smooth the seam with an iron. The edges of the material are carefully overcast.
- The belt is reduced in size and sewn into place.
Having minimal experience in sewing, you can reduce the waist of trousers without a machine and make clothes comfortable.
How to sew sweatpants to size?
Sweatpants differ from classic trousers in that they are usually sewn without a belt, with an elastic band. To reduce a leotard by one size, you need to do the following:
- Try on the product, turning it inside out, and mark the lines of the new seams with pins.
- Pull out the elastic and undo the drawstring.
- Open the bottom cuffs, if the model has them, and rip the seams on the outside of the leg.
- Sew a side stitch along the chalk line.
- Try on the pants and make sure that the seams do not pull or restrict movement.
- Trim off excess material and finish the edges with an overcast stitch.
- Fold the top of the pants, insert an elastic band or lace.
To complete the work, you need to return the cuffs to their place or make a hem. At this stage of work, you can at the same time adjust the length and, if necessary, make the pants a little shorter.
To work with knitwear, it would be correct to take a special needle with a round end. She carefully moves the threads apart and does not tear the fabric.
How to sew jeans at the waist and sides?
Everyone has encountered the need to sew up jeans at least once in their life. It happens that the product is initially too big or has stretched during wear. As soon as you lose a little weight, your jeans begin to sag both in your legs and at your waist.
Remaking jeans, unlike redesigning regular pants, is associated with certain difficulties. Rigid material, numerous rivets, belt loops and labels, as well as decorative double stitching with contrasting thread make the job much more difficult. Although the general technology is the same.
- The first step is to rip off the belt along with the back loops and the leather label. All parts are carefully folded and put aside for a while.
- Rip the side seams 10 cm from the top edge and carefully smooth the fabric in this place with an iron.
- Mark the line of the new seam, sweep away the details and try on the product.
- The parts are sewn together with strong cotton threads, the seams are smoothed with a hot iron, and the excess material at the edges of the stitching is cut off, leaving 1 cm. This way you can reduce the jeans at the waist by 3-4 cm - no more.
- The belt is cut in the middle, the extra centimeters are removed and sewn again. The new seam can be disguised with a back loop.
- Sew the belt, belt jumpers, and branded leather label into place.
Legs that are too wide are sewn in along the inside seam. There are no decorative stitches or rivets that will interfere with the work.
If your trousers, jeans or sweatpants have become too big, don’t be upset and throw your favorite clothes into the trash. You can correct the current situation without financial investments and the involvement of professionals - take a needle and thread and sew in your pants to the desired size.


Everything is clearly written. It wasn't difficult to sew in my daughter's jeans.