Is it possible to clean a laptop keyboard with a regular vacuum cleaner?
You can clean your keyboard with a vacuum cleaner, and you should do it as often as possible. Otherwise, you risk becoming a user who cannot use all the functionality of the computer due to “sticky” keys. A simple home vacuum cleaner is suitable for cleaning, but if you have a special one with a thin spout at hand, the work will move faster.
When is vacuuming acceptable?
It should be immediately clear that vacuuming is not suitable for all situations. For example, this household appliance will not save you from spilled juice or coffee, but it will cope perfectly with dust and small debris.
When can you clean your laptop keyboard with a vacuum cleaner?
- If the buttons start to stick or there is a clear “underpressure”.
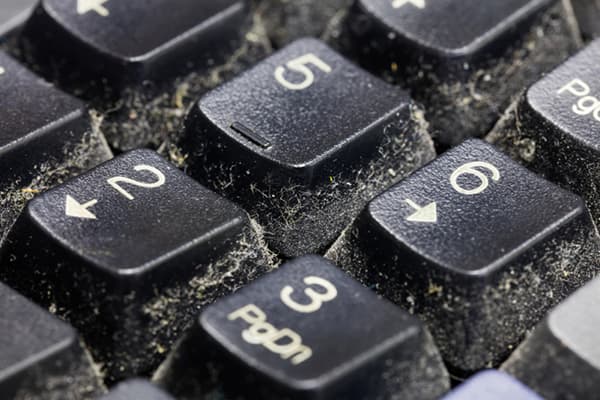
- When dust is visible to the naked eye on the surface of a push-button device.
- When the case heats up excessively.
- After a long period of inactivity.
In general, it is better to set yourself deadlines and strictly adhere to them. For example, clean it every 2 months.

When is a complete disassembly necessary?
There is never any need to rush, and if the keys on the computer become difficult to press, then the first thing you should do is clean it without disassembling it – superficially. It is not necessary to use only a regular vacuum cleaner: now there is a whole arsenal of brushes with bristles of different hardness.
If superficial cleaning does not help and the keys still cannot be pressed, then you will have to completely disassemble the device.

Cleaning without disassembling the keyboard
A home vacuum cleaner is suitable for this procedure, but if you use your computer frequently, it is better to purchase a small and convenient device designed specifically for cleaning keyboards. Nowadays they even produce USB devices that work directly from the computer.
- Turn off the computer or battery if the product is autonomous and works via a Bluetooth port.
- Tilt the keyboard slightly, turn on the vacuum cleaner in suction mode and carefully walk along the rows of keys. Preferably several times.
- Switch the vacuum cleaner to blowing mode and repeat the procedure, placing the device at a different angle. If your household appliance does not have a blowing mode, then you can use a simple home hair dryer, setting it to the minimum temperature setting.
- At the final stage, the keys must be wiped with alcohol or a damp cloth. You can only use wipes that are made specifically for cleaning computer surfaces. They do not contain aggressive substances.
If superficial cleaning does not produce results, then consider another procedure - with complete disassembly of the device.
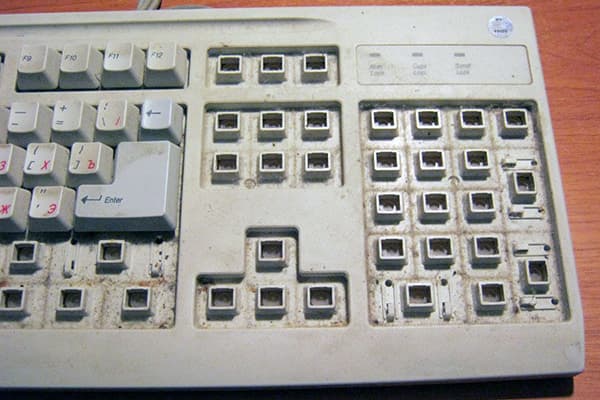
Complete disassembly of the keyboard and cleaning with a vacuum cleaner
Arm yourself with a thin metal screwdriver with a flat end, you can begin to completely disassemble the push-button device:
-
- If you are disassembling a laptop, then first you need to remove the keyboard from its case. Usually it is secured with plastic latches, but it is better to watch a training video on the Internet specifically for your model. In stationary models, everything is simpler: unscrew a few bolts on the back panel and access is open.
- Now it's time to remove the device from the laptop or carefully remove the buttons on the stationary version.
- Having taken the device out, you can begin to remove the buttons. It is very convenient to do this with a flat, thin screwdriver, prying each on one side. You must act carefully, since the keyboard is connected to the motherboard with a thin cable. Damage it and repairs will cost a pretty penny.
When starting to remove the buttons, do not forget to take a reference photo of the layout, so that later you do not forget its correct sequence.
- The buttons are removed and you can start vacuuming all the elements. Just be sure to hold all the removed parts well when cleaning, otherwise you will have to take them out of the dust bag later. After the suction mode, you can turn on the blowing and walk through the disassembled device again.
- The cleaning is complete and you can begin reassembly.
If the keys continue to stick, then the reason may be a malfunction of the spring mechanism or some contact. Such repairs are difficult to carry out on your own; you will have to entrust the keyboard to specialists.