5 life hacks using masking tape that a good owner should know about
Yesterday I went to a hardware store to buy screws and decided to buy masking tape at the same time. The seller, with whom we became friends and always exchanged a few phrases about life, asked: “Are you going to paint something?” And I thought that most people associate this tape with gluing baseboards, door frames and other surfaces that you don’t want to get dirty. Although in fact it can be used in everyday life, greatly simplifying the performance of certain tasks.
Today I'm going to tell you how I use masking tape in situations that have nothing to do with painting. I learned some of these tricks from neighbors or colleagues; others I came up with myself and only later came across references to similar life hacks when communicating with other people. I would be glad if any of this is useful to you.
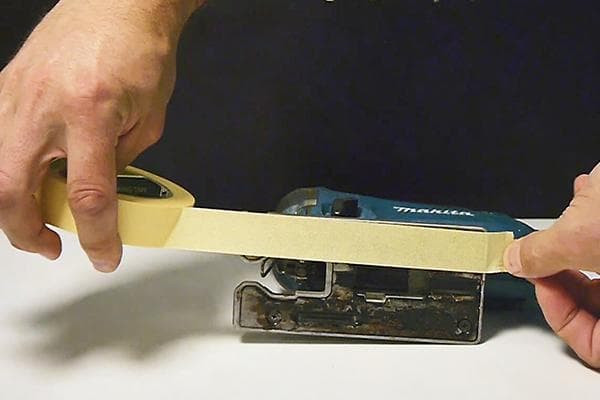
1. Protect glossy surfaces
Sometimes you have to use a jigsaw to cut materials with a very delicate surface, on which scratches and abrasions easily appear. If the jigsaw is new, problems, as a rule, do not arise. But if it is already “well-worn,” then there will inevitably be burrs on its sole. Running such a tool over something like a polished countertop can easily ruin an expensive item.
This is where masking tape comes to my rescue. It is enough to paste it over the sole of the jigsaw - and the burrs will no longer be dangerous.At the same time, paper tape does not interfere with the work at all.
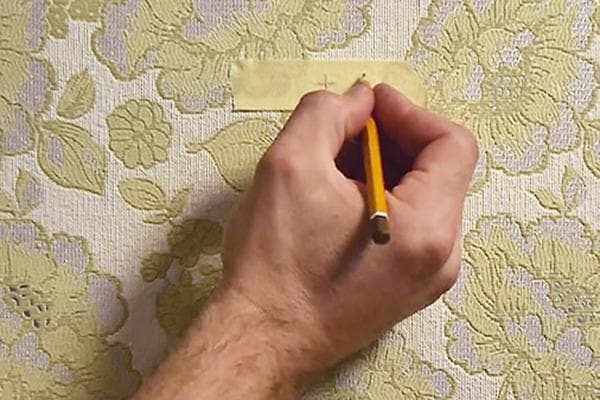
2. Marks on wallpaper
I love beautiful wallpapers. And you certainly like them too. But what if you need to make marks on the wall - for example, put crosses at the locations of the screws? After all, it’s not always possible to find the right point the first time. Even if you use a simple pencil, marks from the lead or whitish spots from the eraser will remain on the surface.
Masking tape saves me in situations like this. I just cut a piece, mark it, and then stick it to the wall. I’m not happy with this arrangement - I tear it off without any harm to the wallpaper and re-glue it higher and lower, right and left.
I also once had to measure the walls with a tape measure with a canvas length of only 2 m. I didn’t want to put “notches” on textured beige wallpaper, so I resorted to my favorite method - I measured the length as far as the tape measure was, and marked this place on a piece of paint glued to the wall. tape and then calmly measured further.
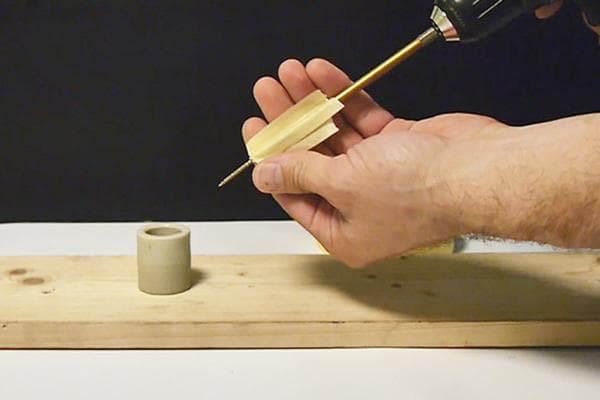
3. Holder for self-tapping screws
Sometimes you need to screw in a self-tapping screw where you can’t hold it with your hand. In such cases, a magnetic bit or screwdriver comes to the rescue. But such a tool is not always available, so you have to look for other options. Personally, I’ve been using the following life hack for several years now:
- I tear off a fairly long piece of masking tape (12–15 cm).
- Holding it with the adhesive side up, I pierce it with a self-tapping screw right up to the cap.
- I insert a bit or screwdriver into the recess on the head.
- I wrap the ends of the tape up so that they stick to the screwdriver or bat, and fix them tightly. And so as not to interfere while working, I wrap them around a screwdriver.
After all the mentioned manipulations, the self-tapping screw does not fall off the screwdriver and can be easily tightened. Then it is enough to pull the tool towards you - the paper will tear, an invisible piece of masking tape will remain under the head of the screw, and everything else will be held on by a screwdriver or bit.
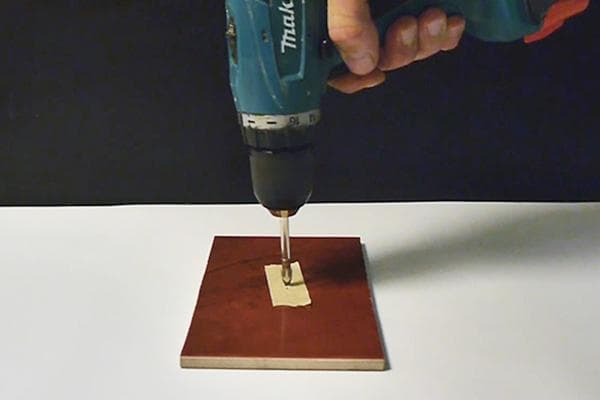
4. Anti-slip lining
If you've ever had to drill into smooth, slippery surfaces, you've probably cursed more than once in the process because the drill tries to “run away” to the side, and holes appear in places that are not at all where you would like them to be. I myself suffered a lot working with ceramic tiles until I came up with the great idea of sticking masking tape in the right place. It has a rough surface, so the drill does not slip and enters the material exactly where it is needed.
By the way, another advantage of this idea is simple markup. Drawing a “crosshair” for a drill on a smooth tile is not an easy task, but a pencil can draw on the surface of the tape without any problems.

5. Keeping it clean
Drilling through a wall without getting everything dirty is quite a challenge. Someone gets perverted by holding a screwdriver in one hand and holding a vacuum cleaner hose to the hole with the other. I prefer another way:
- I stick a strip of masking tape on the wall and make a mark on it that indicates the location of the future hole.
- I glue a sheet of paper underneath, also securing it with tape.
- I fold the paper in half and secure the sides with tape to form an envelope.
- I bend the top of the envelope (this will make it easier for dust to get into it) and drill a hole.
Upon completion of the work, I “seal” the envelope with tape and easily remove it from the wall. All dust remains inside, and not on the walls, floor and clothes.
This, of course, is not the entire list of life hacks using masking tape, but the tricks that I mentioned are most often used in everyday life. By the way, there is one more thing: if you accidentally cut yourself or scratch yourself while working, and you don’t have a bandage or plaster at hand, cover the wound with masking tape. This, of course, is a temporary measure and you need to get to the first aid kit as quickly as possible.