How to make an invisible seam by hand - 4 ways
Hand stitches are the basis of sewing. Even with modern technology, sometimes you can’t do without them. Today we will tell you how to make an invisible seam (also called a hidden seam). With its help, you can quietly sew up a hole, hem trousers, sew the edges of a product and perform a number of other operations.
Invisible seam No. 1 – “Ladder”
The first option of a hidden seam will be appreciated by lovers of all kinds of life hacks. It's all about the speed of its execution and versatility.
The ladder stitch is indispensable in the following situations:
- the item is torn at the seam;
- you need to sew together the parts of the product;
- sew the lining onto the jacket;
- sew a stuffed toy, belt or other product that turns inside out through the hole.
We make the seam step by step:
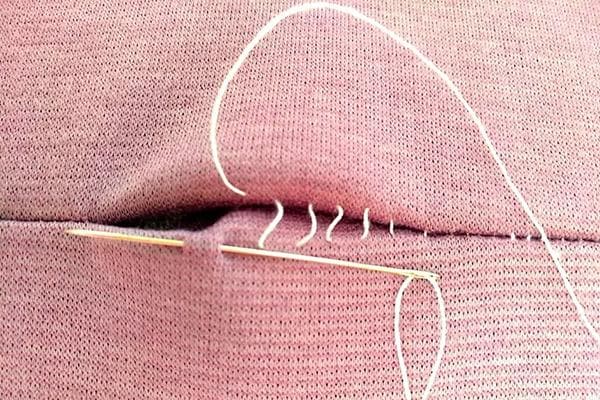
- First of all, iron the seam allowances to the wrong side. We will sew by passing the needle and thread exactly into the fold.
- Thread a needle with a thread matching the color of the fabric and tie a knot at the end.
- Place the needle and thread under the seam allowance and pull it out at the edge of the piece to be sewn from the front side. The knot will be hidden in the fold.
- Insert a needle into the edge of the second piece opposite the first puncture. Under the fold, on the wrong side, make a small stitch (0.5 cm).
- Pierce the opposite side. The needle should go exactly into the edge of the fold. The punctures are located opposite each other. Sew a 0.5cm stitch under the seam allowance.
- Repeat until you have completed 4-5 stitches.
- Slowly pull the thread, tightening the edges of the parts.
- Continue sewing in the same manner until the end of the folds.
- Secure the thread with a knot and cut the thread.
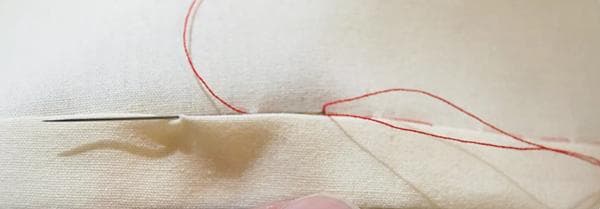
A clear example of how an invisible seam is made:
Indistinguishable from machine stitching!
Video instruction:
Invisible seam No. 2 – “Emergency”
The second hidden seam can help out in an unforeseen situation. For example, a hole appeared right before an important event, but there is no time to repair the product. You can sew it up with an invisible seam directly on yourself.
Step-by-step instruction:
- Thread a thread matching the color of the item into the eye of the needle. Tie a knot at the end of the thread.
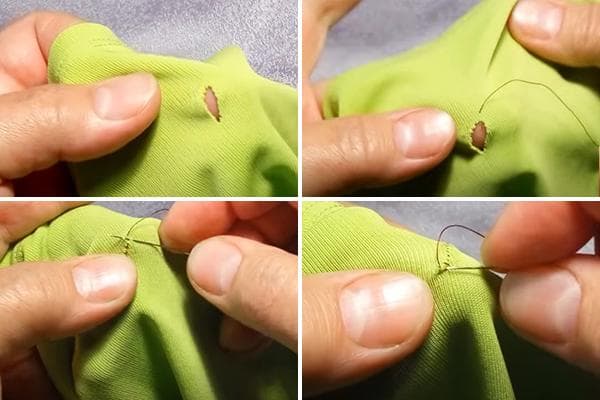
- Thread the needle through the hole. Bring it out at the edge of the hole, leaving a knot on the wrong side.
- Using a needle, pick up several threads of fabric from one side of the hole and then from the other.
- Pull up the thread.
- Having retreated a few mm, again pick up the fabric at the edges of the hole and pull it off.
- Continue until the hole is completely sewn up.
- Make a knot and cut the thread.
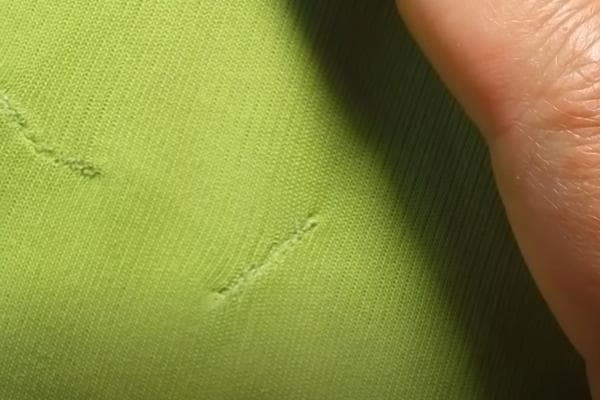
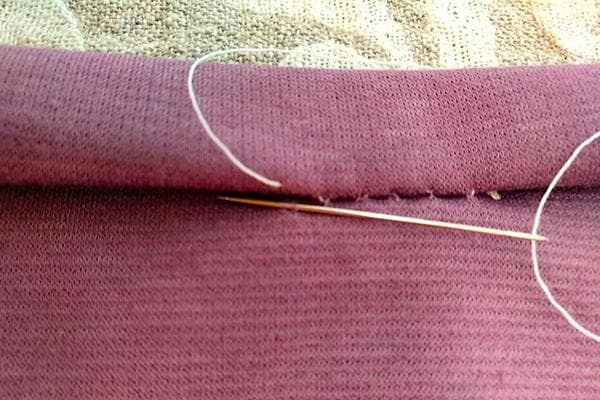
The photo clearly shows how an “emergency” blind seam is performed.
In the master class, the thread is used in a contrasting color so that the viewer can see the details of the process. If you match it to the color of the product, the seam becomes more invisible.
Invisible seam No. 3 – “Hemming”
It is not difficult to guess from the name what this seam is intended for. It is used if you need to reduce the length of trousers or sleeves manually. In this case, the excess fabric is not trimmed, but tucked under. You can also sew a drawstring using this method and insert an elastic band into it. For example, to narrow a dress at the waist.
An invisible hem stitch looks like this:
The difference with the classic filing method is obvious:
How to hem trouser legs step by step:
- Measure the desired length of the trousers. We celebrate with soap.
- Fold the excess fabric to the wrong side 1-2 times. Secure with pins.
- Take a thread that matches the color of your trousers, insert it into a needle, and tie a knot at the end.
- Place the needle under the folded fabric. Inside it we make a stitch of 0.7 cm and bring it out through the edge of the fold.
- We pick up 1-3 threads on the fabric to which we sew the hem.
- We insert the needle into the fold in the place where the thread came out. Make a stitch of 0.7 cm.
- We pick up 1-3 threads on the fabric under the hem and return the needle to the edge of the fold. Making a stitch.
- We continue to sew in the same way. To prevent the fabric from wrinkling, do not pull the thread too tightly.
Video instruction:
Invisible seam No. 4 – for knitwear and knitted items
No one is safe from a hole in their sweater. Many people know that such holes tend to spread quickly. To prevent this from happening, you should repair the product correctly. Knitwear and knitted items have their own invisible seam.
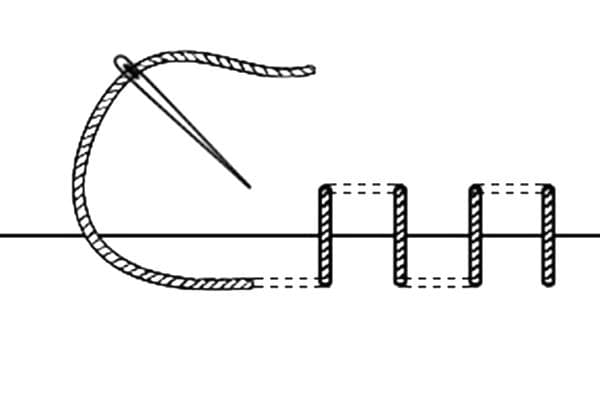
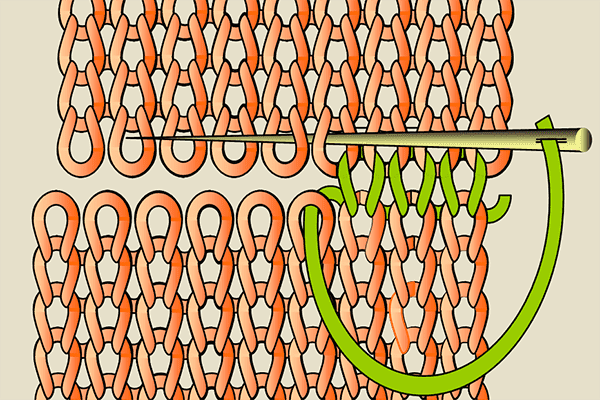
Let's pay attention to the diagram:
Progress:
- First you need to find the threads that have broken and bring them to the wrong side.
- Next, we arm ourselves with thread to match the color of the product. We insert it into the needle.
- We tie the end of the thread to the end of the broken thread.
- We bring the needle to the front side. We pass through the 2 upper loops, then through the 2 lower ones (see diagram).
- Continue darning until all the loops are secured.
- Let's go to the wrong side. We tie the thread to the second torn end.
- Ready!
If the knitting is small, you can use a magnifying glass.
A clear example of how to properly sew up a hole on knitted items and knitwear:
Questions and answers
Why can an invisible seam turn out sloppy and crooked?
This happens if you are in a hurry. Please note that seam allowances must be ironed. The folds meet the machine seam.After this, small stitches are made. They should be located on the same line. It is also important to choose the right needle and thread.
How to choose the right thread and needle for a blind stitch?
The thread and needle should be thinner than the fabric. It is important that the needle is sharp and can catch individual threads. The thread should be strong and untwisted. Color – transparent or similar to the product. The invisible seam is made with only one thread!
How to make an invisible seam without a needle and thread?
This repair method is used as an emergency method for small cuts and holes in the fabric. Buy a special thermal tape to match the color of the product. A patch is cut out of it and installed on the wrong side. The repair area is covered with a cloth from above and slightly moistened with water. The last stage is ironing the patch with a hot iron.
An invisible seam can be done either by hand or with a sewing machine. In everyday life, the first option is more in demand. It will be much faster to sew up a hole by hand. Having mastered a simple technique, you can hem trousers, repair a seam that has come apart, quietly patch a hole, sew a Tilda doll or a pillow. If you make small and neat stitches, the stitching will be truly invisible.
nothing complicated. Anyone comfortable with a needle and thread.
Quite simple methods. I most often use the “ladder”. A very convenient way.
How to sew it so that neither patch nor seam is visible?