How to tie your shoelaces beautifully if you want to surprise. 25 original ways to lace up your favorite sneakers
Content:
- How to lace long shoelaces to make them shorter
- How to tie sneakers without tying the laces
- How to tie shoelaces with a bow
- How to quickly tie your shoelaces
- Zigzag European
- How to beautifully tie laces on sneakers with complex crosshairs
- How to lace sneakers by weaving the laces beautifully
- How to tie laces on sneakers using the straight method
- How to tie sneakers beautifully using shapes
- Choosing a pattern for different shoes
Tying shoelaces beautifully is not as easy as it seems at first glance. There are many lacing methods that will allow you to update your usual shoes and eliminate the need to buy new sneakers or sneakers.
How to lace long shoelaces to make them shorter
To make long laces shorter, you don't need scissors, but a little imagination and sleight of hand.

This method is designed for shoes with six lacing holes:
- Pass the ties through the holes with the aglet (plastic end of the lace) inward.
- Pull the left lace out through the top left hole.
- Bring the right one out through the second right hole (if you count from above) and insert it into the parallel left hole.
- Lower the right end of the lace down and out through the second left hole (counting from the bottom), insert the end of the same lace into a parallel hole on the right side.
- Pass the right end through the bottom again and out through the third hole on the right (counting from the top). Insert it into the parallel hole on the left.
- Pass the right lace at the bottom and bring it out into the fourth hole on the left (if you count from the top).
- Then insert the end into the parallel right hole, and passing inside, bring it out through the upper right hole.
Before lacing, you need to remember that the left side of the ties must be at least 4 times shorter than the right.
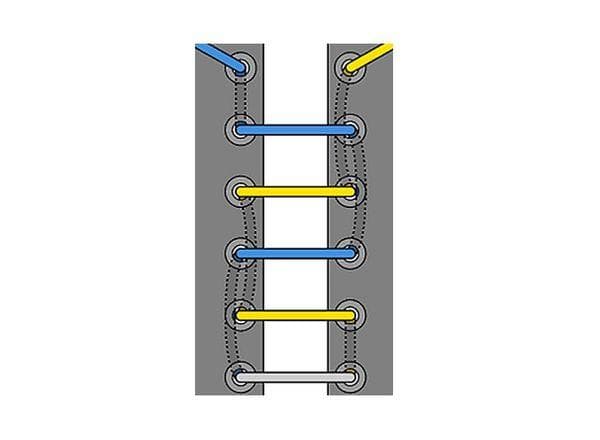
How to tie sneakers without tying the laces
In the process of teaching children to put on their own shoes, one of the most difficult moments is the process of tying their shoelaces. Kids can spend a few minutes on a simple bow. However, many adults do not like to waste time on such fixation.

There is a way out - you just need to learn how to lace your shoes without tying the final knot.
To do this you need:
- Insert the ties into the bottom holes with the ends facing inward.
- Bring the right end out through the next upper hole (second from the bottom) and immediately insert it into the parallel left hole.
- Bring the left end out through the third left eyelet (count from below) and insert it into the parallel right one.
- Repeat the operation, each time moving one hole upward until the last one is reached.
- Place the right end of the lace into the left parallel lace hole, and the left end into the right one.
- Tuck the remaining ends inside the sneaker.
The resulting parallel lacing looks aesthetically pleasing, performs all its functions and does not require final tying.
How to tie shoelaces with a bow
People learn to tie shoelaces with a bow in kindergarten. This is the easiest way to firmly and beautifully fix the laces.
- Tie a single knot.
- Fold the ends of the laces in half and use the resulting “ears” to tie another knot.
- Tighten the knot tighter, straighten the bow and, if necessary, fix the ends in the lacing.
However, you can tie your shoelaces even easier, spending no more than 2 seconds on it. Videos with similar life hacks have been circulating on the Internet for a long time.
You just need to fold the ends of the laces into the “ears” and tie a knot from them. The main advantage is speed and simplicity. Disadvantage: weak fixation.

How to quickly tie your shoelaces
There are many ways to lace your shoes. Some people choose the fastest option, others prefer original and unusual methods that attract attention.
Classic version
Sneakers and sneakers that are laced with a “classic zigzag” do not rub your feet and at the same time fit quite tightly on the foot. The disadvantage of such lacing is that if it is tightened too much, it can deform the shoes.
- The ties are passed through the lower holes, bringing it out simultaneously with both ends up.
- Then the ends are crossed and threaded inside through the eyelets of the next row.
- Then they cross again and take them out through the holes, continuing to repeat the steps until the rows of holes run out.
The order can be changed starting from the first action. That is, on the initial row the lace can be threaded both inward and outward.
The traditional option is great for “iziks”, which have no more than six holes.
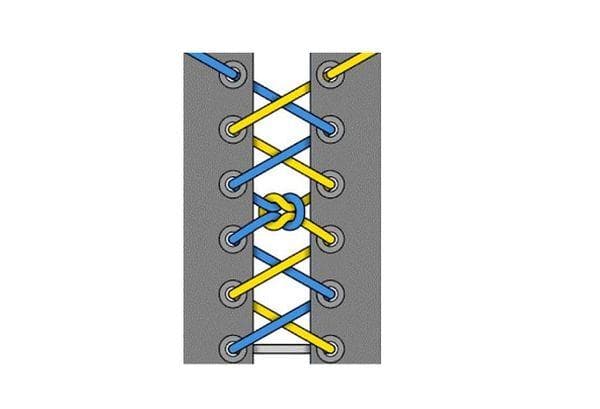
Knot for memory
The “classic zigzag” can be easily varied by one or more knots. They are tied simply by crossing the ties twice. That is, on the same principle as a traditional bow. Despite the fact that “memory knots” give the lacing an original look, you need to remember that they interfere with the overall tension.
Army
The main advantage of the military method is the speed of lacing. It's great for short laces. Externally, “military” lacing resembles a simplified “zigzag”. The difference is that after threading through the eyelets, the ties without crosses (parallel to each other) are inserted into the top row, and only then are crossed and threaded into the eyelets. As a result, on classic shoes with six eyelets, no more than two “crosses” are obtained.
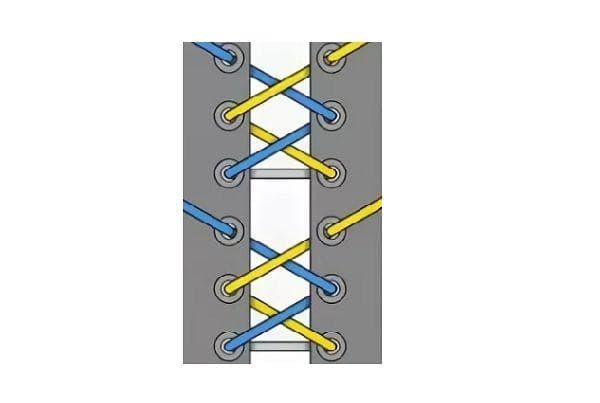
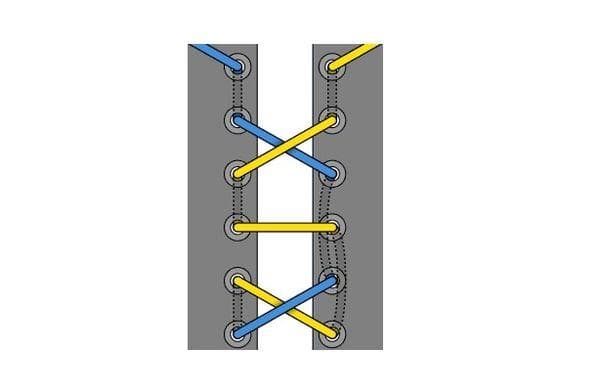
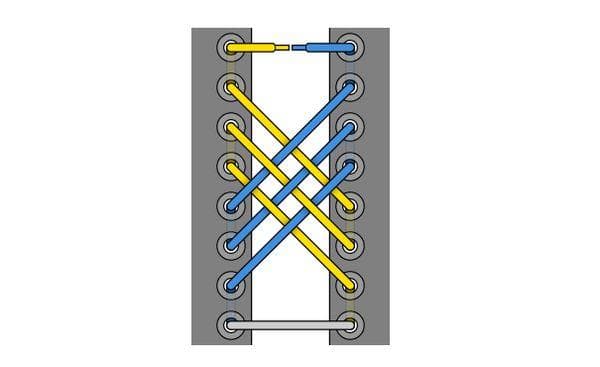
Crosshair with skip
This method is a “classic zigzag” with one gap (usually in the middle). This is a great option for people with high arches.
Diamonds
It all starts traditionally:
- The laces are threaded into the lower eyelets and at the same time brought out.
- Then they cross and thread into the holes of the fourth row.
- Then they go down one row and go out through the eyelets of the third row.
- Then the action is repeated from the very beginning.
Unlike the usual crosshair pattern for 3 rows (as with a “zigzag”), with “diamonds” it occupies 4 rows. After tying the laces, the penultimate row remains empty.
This is interesting! The exact date of the invention of shoe laces is known. This happened on March 27, 1790. On this day, their inventor Harvey Kennedy received a patent for them.
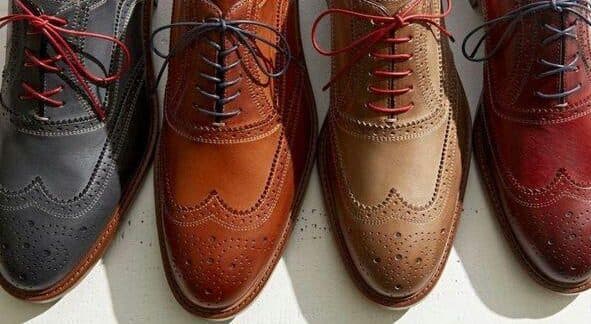
Roman
When lacing shoes with six pairs of holes using the Roman method, you can see Roman numerals at the end of the process.
- Thread the lace into the two eyelets on the left side (one above the other), bring the ends out, make crosses and thread them into the corresponding holes on the right side.
- Pass the end of the lace from the bottom eyelet inside and out through the third hole.
- Thread the same cords again into the parallel hole on the left side (you get the Roman numeral I).
- Pass the second end of the lace, which was inserted into the left hole of the second row, inside and out through the left eyelet of the fourth row.
- Make a cross again (you will get a second X).
- Secure the lacing with a knot.
Classic men's shoes are most often laced using the Roman method.
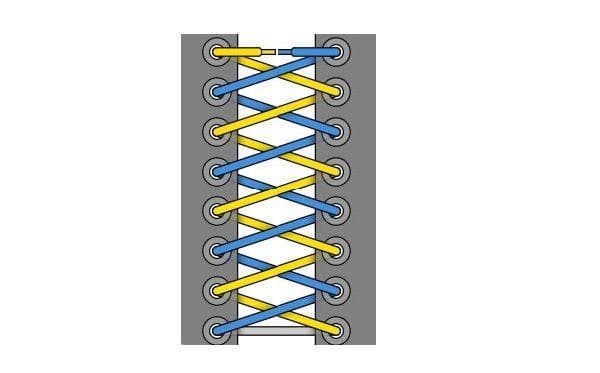
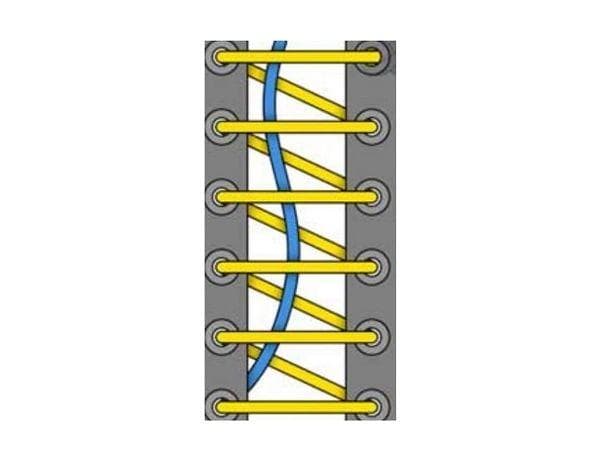
Zigzag European
The European method is considered one of the strongest and easiest lacing methods.
- Thread the ties, ends inward, through the bottom row of holes.
- Bring the left end diagonally through the third eyelet on the right side.
- Then thread the same lace, end inward, through the parallel third hole on the right side.
- Pull it out obliquely again and repeat the previous operation.
- Pass the right end of the lace inside and out through the second right hole.
- Then thread it through the parallel second eyelet on the left side.
- Pass inside again and bring out diagonally through the fourth hole on the right.
- Pass it through the parallel fourth eyelet on the left and send it diagonally to the right side.
European lacing looks aesthetically pleasing and is most often used on sports shoes (sneakers, sneakers, boots).
How to beautifully tie laces on sneakers with complex crosshairs
Most original lacing takes time. However, the result is worth it.
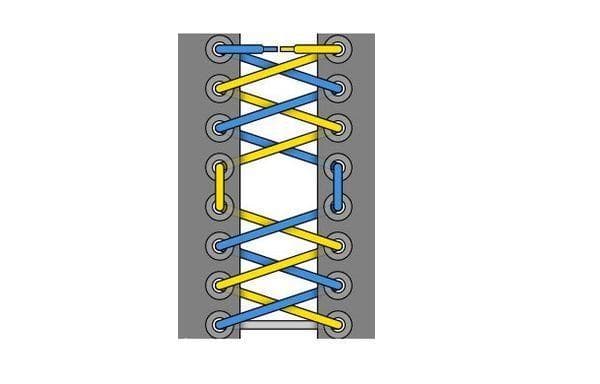
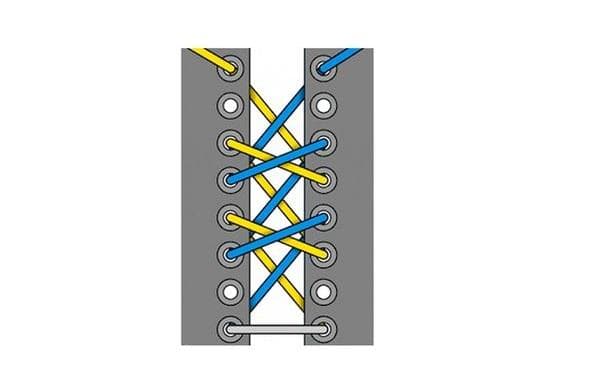
Reverse crosshair
This method begins in an unusual way - by installing ties in the second pair of holes (counting from the top). Lacing at the first stage goes from bottom to top, and then vice versa.
- A regular cross is made, and the ends are passed into the third pair of eyelets (counting from the bottom).
- The crosshair is repeated and the laces are threaded into the first lower row of holes, and threaded from top to bottom.
- Then the ends from the inside are brought out into the second pair of eyelets (we still count from the bottom), with the left lace in the upper left hole, and the right one in the right.
- A crosshair is made again, and the ends are drawn through the eyelets of the fourth row (counted from the bottom).
- After the last crosshair, the laces come out through the eyelets of the sixth row and are secured with a butterfly knot.
This is one of the most attractive types of lacing.

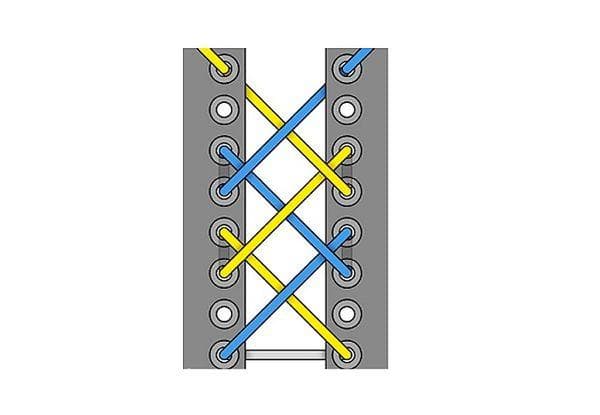
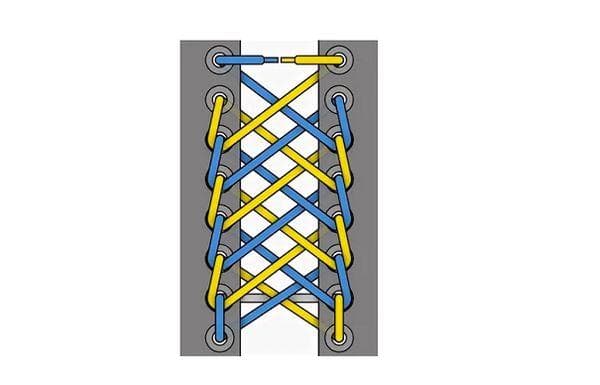
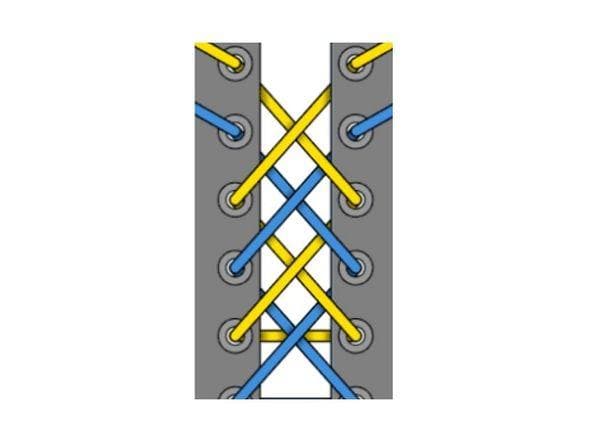
Double crosshair
The double crosshair looks chaotic at first glance, but that’s what makes it interesting. To understand exactly how to lacing, you need to consider the process step by step:
- Pull the lace through the bottom holes with the ends facing inward.
- Make a crosshair and bring it out through the fourth row of eyelets.
- Make a crosshair again and lower it down into the third row of holes (the second should remain empty in the end).
- Make a crosshair (it will be inside) and bring the ends out through the sixth row.
- Again, making a cross, lower it to the fifth row and crossing the laces inside, bring the ends out to the eighth row of holes (the seventh row will remain empty).
- Secure with a knot.
The upper part of the lacing is a “cross”, and the lower part is a “diamond”. This way you can lace up women's sneakers or sneakers.
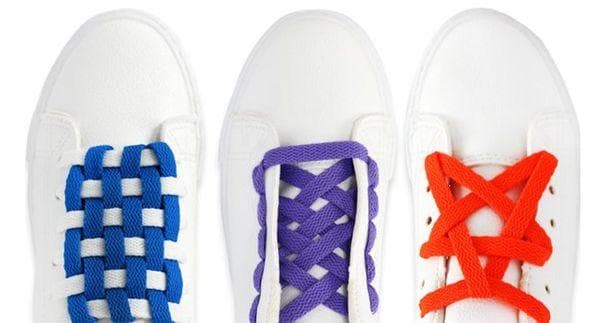
Lattice
A very beautiful type of lacing, which can act as a separate decorative element of shoes.
- Insert the ties into the bottom row of holes and bring the ends out.
- Make a crosshair and insert it into the fourth row of eyelets.
- Pass the inside down and out through the second row, so that the right end comes out of the right second eyelet, and the left end comes out of the left.
- Make a cross again (intertwining with the previous “cross”) and insert it into the fifth row of holes.
- Lower the ends and bring them out through the third row.
- Make a crosshair and bring the ends through the eighth row of eyelets, then secure everything with a knot.
This type of lacing is reminiscent of basket weaving. In order not to spoil it, the ends of the laces are most often not tied, but tucked inside, under the tongue. Pros - it does not come loose or loosen. Cons – takes time.
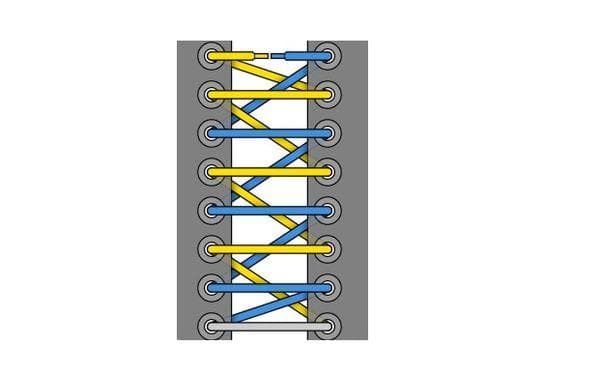
World Wide Web
This type of lacing is suitable for shoes with six pairs of holes. The main disadvantage is that it is difficult to tighten, but sneakers laced in this way fit tighter on the foot.
- Insert the ties into the second row of eyelets from the bottom, pull them out and pass them through the holes of the first row.
- Make a crosshair and bring it out through the holes of the third row.
- Lower the ends of the ties down and thread them through the loops formed between the second and first holes.
- Make a crosshair again and insert the laces into the fourth row of eyelets with the exit outward.
- Bring the ends back down to the third row and pass through the loops between the second and third eyelets.
- Repeat the operation until the top row is reached.
The result of the manipulations will be double weaving: on top and on the side.
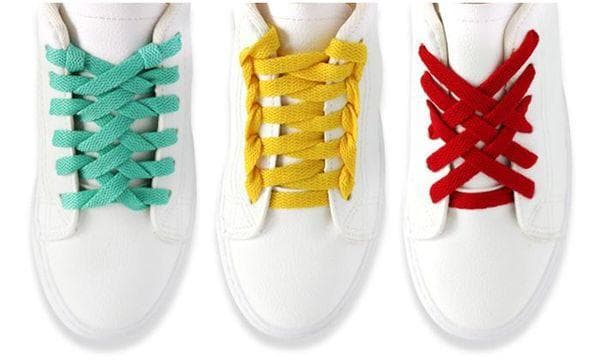
How to lace sneakers by weaving the laces beautifully
Knots can become a separate decorative element of any lacing. Even a beginner can braid them, but to improve your skill, it’s worth practicing once again.
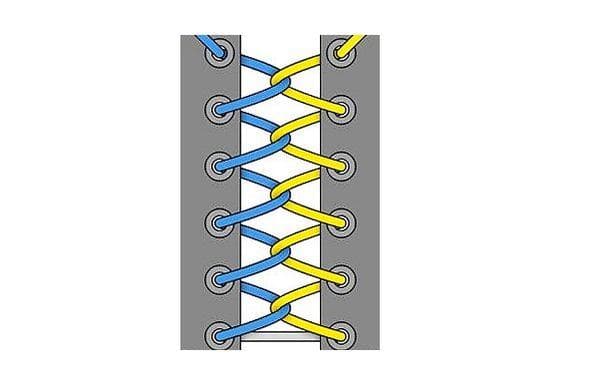
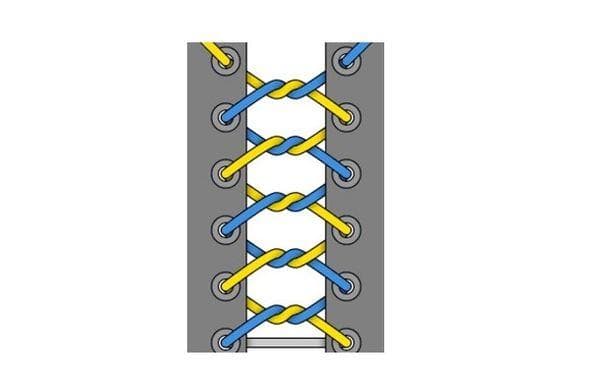
Single weave
One of the simplest weaves that even a child can easily repeat. The subtlety is that when crossing, the laces are twisted once, after which they return to their side and are threaded into the next row of eyelets.
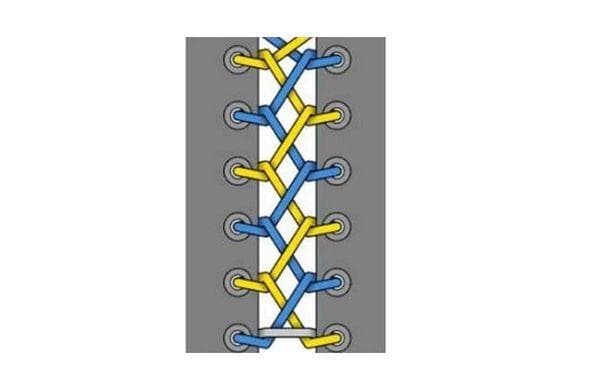
Double weave
Double weaving differs from single weaving in that the twisting occurs twice. After this, the ends of the laces do not return “to themselves,” but are threaded into the next row of holes on the opposite side. This type of lacing is more difficult to tighten, although it looks a little more impressive.
Knotted lace
Everything is quite simple here. When lacing, instead of a crosshair, a horizontal knot is tied, the ends of which are brought out through the next row of the parallel side. It looks pretty cool. Due to its simplicity, such lacing is in demand among teenagers.
Lightning
A more complex option that should be considered step by step:
- Insert the ties into the first row and bring the ends out.
- Bring the ends under the horizontal line of the lace, and creating a crosshair, insert it into the second row of holes (from the inside out).
- Pass the ends under the crosshairs again and thread the laces into the eyelets of the third row in the same way.
- In this way, bring the lacing to the upper eyelets.
This type of lacing should not be attached to a bow. To prevent the ties from sticking out, you can put them inside the shoes.
How to tie laces on sneakers using the straight method
The direct method is less sophisticated than crosshairs, but is great for everyday use.
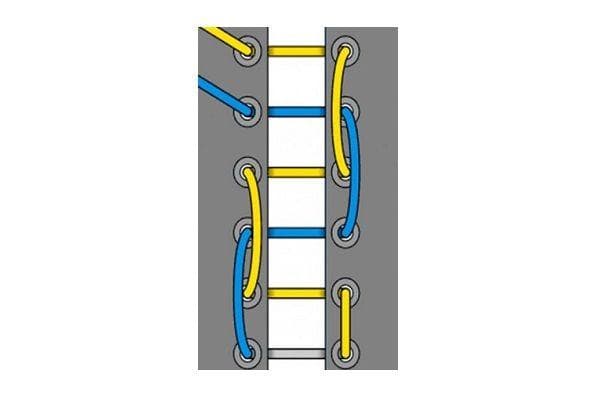
Walking one-sided
When using the hiking method, the ties are fixed on only one side. This is an excellent option for lovers of cycling and hiking. The former prefer fixation from the outside, the latter - from the inside. The inner lacing runs in the form of parallels, and the outer lacing runs in the form of side loops.
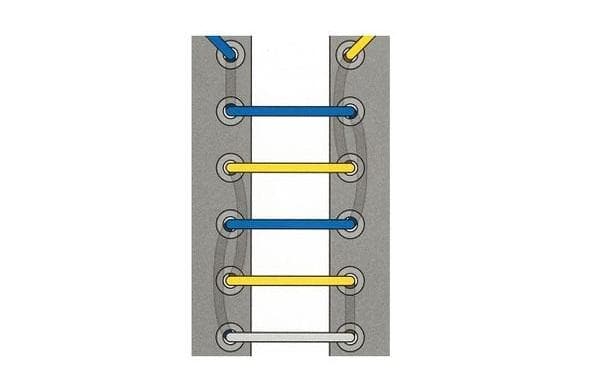
Straight lacing
The straight method reflects the hiking one with the difference that the parallel lacing is now on top, and the side lacing is hidden. The straight look is often found on signature athletic shoes such as the Adidas Yeezy.
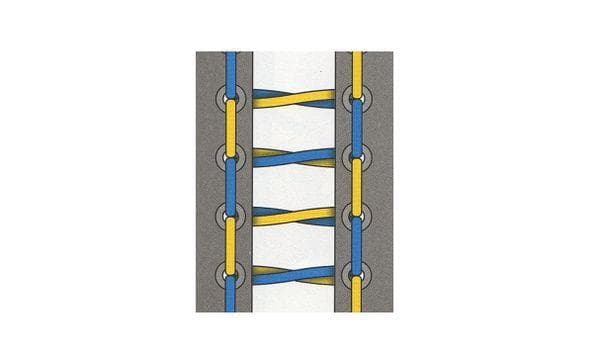
Two-tone straight lacing
Two-color lacing looks cool and unusual. It completely repeats the previous one. Only the main “tool” is two laces tied together.
One-hand lacing
A knot is tightened at one end of the lace, which is threaded into the lower left hole. The end of the lace is then threaded through the parallel right eyelet, passes underneath and comes out through the second left eyelet. It is threaded again into the parallel right hole and out into the opposite third left one. Fixation is carried out by tightening.
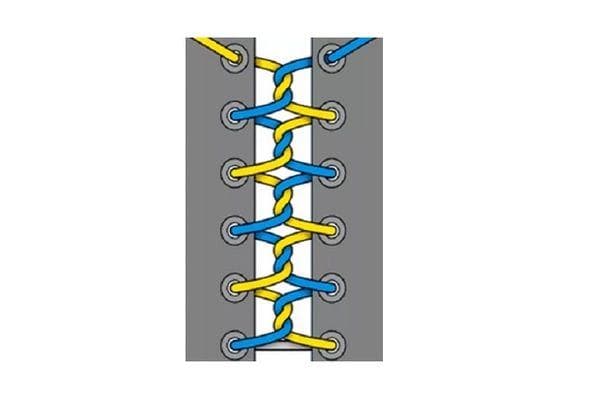
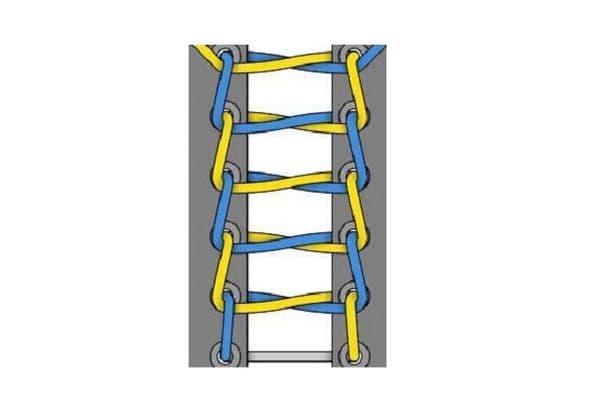
Railway
The method under the unusual name “railroad” looks very stylish. This is exactly what he resembles in appearance.
- The ties are passed through the bottom row and brought out.
- The ends are then passed through the second row of holes, with the right lace going into the second right eyelet and the left one into the corresponding one.
- Inside, the ends cross and are brought out: the left one from the second right hole, the right one from the second left one.
- The ends of the laces again “go” up into the third row (each in its own).
- Then they cross and the operation is repeated.
As a result, two weaves are formed on the shoe: the top horizontal and the side vertical.
Ladder
The “ladder” looks a bit like a “spider web” and is great for making laces shorter.
- Pull the ties through the bottom row and out.
- Thread the ends into the corresponding eyelets of the second row.
- Form a crosshair.
- Insert the left end into the second hole of the right row, so that it passes under the loop formed by the right eyelets of the first and second rows.
- We do the same with the right end, passing it through the loop formed by the left eyelets of the first and second rows.
- We thread the ends into the corresponding holes in the third row.
- Repeat the operation.
It’s unlikely that you’ll be able to quickly lace your shoes this way, but you won’t have to cut the laces.
How to tie sneakers beautifully using shapes
Lace-up figures are, although not functional, but fashionable and impressive.
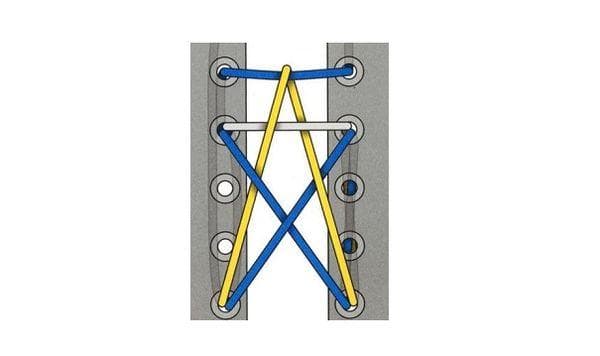
Star
The star holds its shape well on shoes with a hard tongue.
- Insert the ties into the fourth row of eyelets (ends down).
- Bring the ends out (each on its own side) through the bottom row.
- Make a cross and insert the laces again into the fourth row.
- Pass the left end inside and bring it out through the fifth left hole, insert it into the parallel right hole and bring it out on the right side through the sixth grommet.
- Pass the right end inside and out again through the bottom row.
- Then stretch it, weaving it to parallel on the fifth row, hook it and direct it down to the lower left grommet, then stretch it inside and out through the left sixth hole.
You will get a “star”, which will look especially impressive if the laces are contrasting.
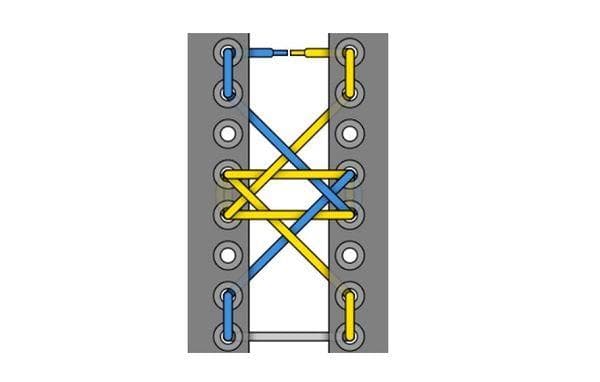
Hexagram
A hexagram or pentagram is a simple figure no more complicated than the previous one.
Briefly about the stages of its creation:
- Insert the ties into the bottom row (ends down).
- Make a cross and insert (inside) through the fourth row of eyelets.
- From the fourth right hole, bring the ends into the third row (each on its own side).
- Throw the right lace over the parallel hole of the left row, then pass it at the bottom and bring it out through the fourth left eyelet.
- Then take the same right lace into the parallel left eyelet, lower it again along the left side into the third row and bring it out.
- Create a crosshair from both ends (intertwining with other lines) and bring it out through the sixth row.
When making a pentagram, you need to correctly distribute the length of the right and left parts of the ties.
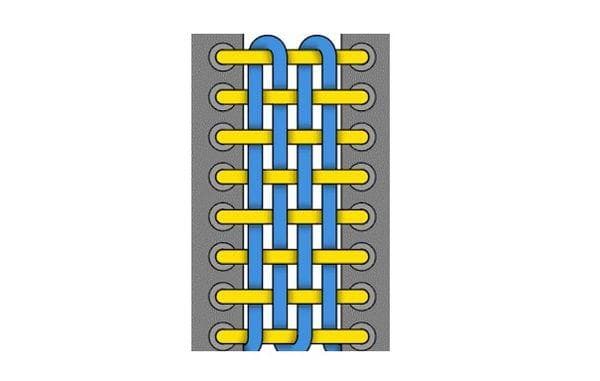
Chess board
For the name to match the original, you will need two laces in contrasting colors.
- The light lace is threaded using the straight lacing method.
- The second weaves through the resulting parallels.
- All ends are tucked inside the shoe.
The best choice would be wide, flat laces.
Two-tone lacing
A fairly simple method that also requires 2 laces. The first is threaded into the first row of eyelets, the second, respectively, into the second. Next, the shoes are laced by simple crossing.
Choosing a pattern for different shoes
Lacing not only affects the appearance of the shoe, but also its fit on the foot. Done correctly, it can even change size.
For sneakers
The choice of pattern for sneakers depends on the number of eyelets on the model:
- 4 – direct method;
- 5 – classic zigzag;
- 6 – any type of lacing.
In rare models with 7 eyelets, you can use lacing designed for an odd number of rows.
For sneakers
To prevent your sneakers from coming undone at the most inopportune moment, you should choose a reliable lacing method. The classic zigzag, double weave, reverse crosshair, hash mark, and railroad are great options. The presence of a large number of rows gives room for imagination.

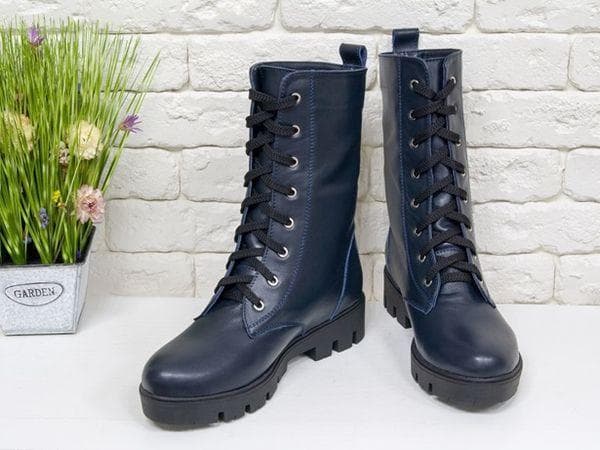
For winter boots
Winter boots are most commonly laced using methods such as ladder, lattice, railroad and single weave. The higher the boots, the more interesting the way you can choose.
For women's boots
For neat women's boots, diagonal patterns are suitable: cobwebs, diamonds, classic zigzag, crosshairs (reverse, double).

For men's shoes
Men's shoes will look great when using methods such as parallel (straight) weaving, ladder, classic zigzag, Roman method.
All presented types of lacing have both an aesthetic component and practical application, making familiar shoes more comfortable and convenient.