Instructions for the ideal husband: how to connect an automatic washing machine?
Content:
Connecting an automatic washing machine yourself is not as difficult as it seems. This is a profitable solution, because the help of a specialist is not cheap. However, connection errors can lead to damage to valuable equipment, so before you get to work, you need to figure out what to do and how to do it. We will tell you about all the nuances of installation, and also share some tips from professionals in the field of connecting washing machines.
Options for placing the machine in the apartment
First of all, it is worth considering the question of where exactly the machine will be located. Unlike old activator-type washing units, an automatic machine is connected to a sewer and water supply system, so moving it after installation will be very problematic. This means that you need to carefully think through all the points in advance.
There are a number of requirements for the installation site:
- Smooth and durable floor.Concrete screed is best, but well-laid tiles or other durable covering are also suitable.
- Access to water supply and drainage pipes.
- Access to an electrical outlet. It is ideal if you can connect the machine directly and not through an extension cord.
- Sufficient space to place the machine itself and access to the laundry loading hatch. It would be good if it would be possible to approach from the sides in order to be able to reach objects that have fallen behind the machine.
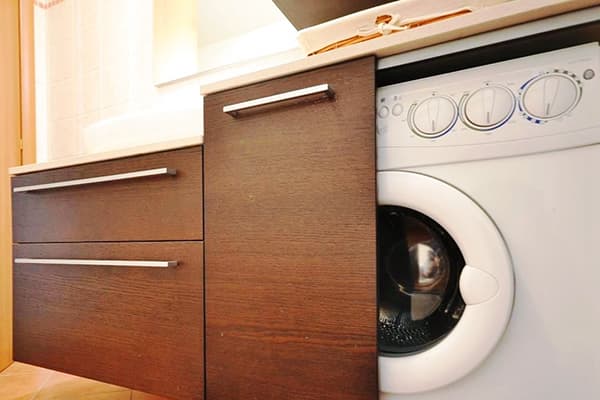
Usually the connection is made in the bathroom or kitchen, since these rooms have easy access to water supply and sewerage. But this is not always optimal. In many apartments, the kitchen and bathroom area is small, and the constant humidity in these rooms does not contribute to the longevity of the device. There are options for installing the machine in the corridor or utility room.
An interesting solution is to place the machine under the sink. This option allows you to take up unused space. The only difficulty is getting the sink to fit correctly. The siphon and all communications must be connected at the rear to leave enough space.
What will you need when connecting?
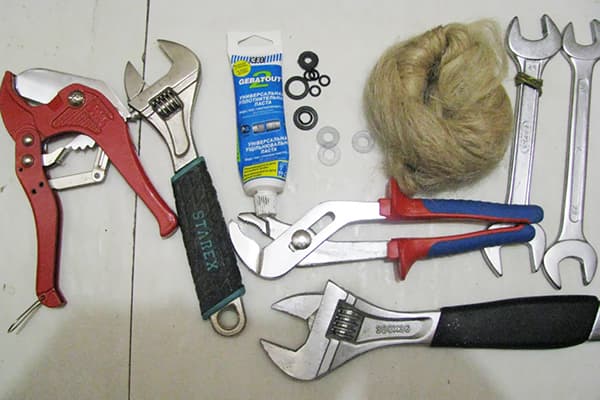
Before starting work, prepare in advance all the tools and materials needed for connection:
- First of all, you will need a non-slip rubber mat or a set of anti-vibration feet.
- To make the connection, you need adjustable and gas wrenches, a screwdriver, and a bubble level.
- Also prepare materials for sealing - combed flax or FUM tape.
In each specific case, the described set is expanded with tools and materials dictated by the connection method.So, to work with plastic pipes you will need a soldering iron, for metal water pipes you will need a tee and welding.
Removing the shipping bolts
Connection work must begin by removing the packaging and fasteners. It is forbidden to turn on the machine before this, as a breakdown is inevitable. In this case, any damage due to remaining transportation bolts is considered not subject to repair under warranty.
All fasteners must be saved, as they will be useful when moving or calling for service. It is not advisable to transport the machine with an unsecured drum, as this can lead to damage.
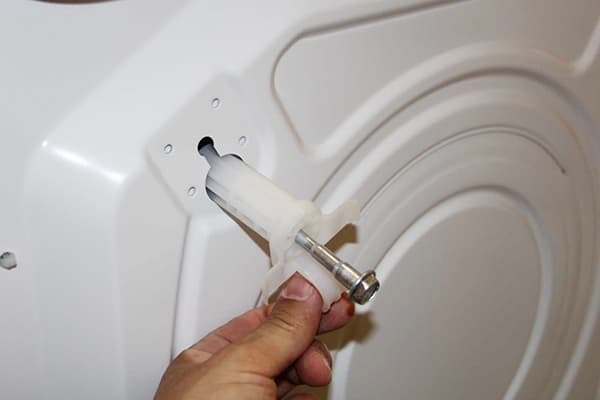
The following fasteners must be removed:
- Clamps holding the hose and electrical power cord.
- Bars inserted between the drum and the body. Just tilt the machine forward and they will give in easily.
- Bolts that hold the drum in place. Plastic plugs are immediately inserted into the bolt holes.
The instructions will help you learn how to properly remove the shipping fasteners. The location and number of bolts varies among units from different manufacturers. Therefore, you should not neglect the instructions.
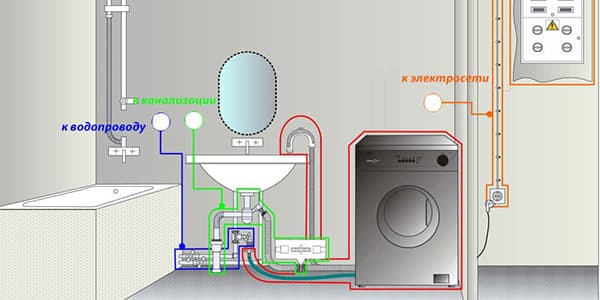
Connection to water supply
This is the most important part of the job. The first question when connecting is which pipe to connect the machine to. Most manufacturers recommend serving cold water. Then the machine itself will heat the water to the desired temperature using a heating element.
Sometimes they connect to hot water to save energy for heating. But this solution has several disadvantages:
- Hot water contains more salts, which form scale. Feeding it into the washing machine will cause the heating element to quickly overgrow.
- If you pay for hot water by meter, the savings are dubious: it’s cheaper to pay the electricity bill.
There are models that have two inputs. They are connected to both hot and cold water at the same time. But most machines on the Russian market have only one input.
The water supply hose that comes with the machine is short (about 0.6–0.7 m). Often this length is not enough for connection. Plumbing stores sell longer hoses (3 m or more). The hose is screwed at one end to the input on the rear wall of the machine. The second end of the hose requires a tap into the water supply. How to make it? There are several options.
Tapping with a crimp sleeve
A crimp coupling will help you make a cut into a metal pipe. This plumbing device consists of two halves, which are placed on the pipe anywhere and tightened together with four bolts. To ensure tightness, a sealing gasket is placed between the coupling halves and the pipe.
One of the two halves has a threaded outlet. When the coupling is put on, a hole is drilled through it in the pipe (you will need an electric drill and a metal drill). The insert is ready, all that remains is to screw the ball valve to the outlet, and to it the second end of the water supply hose.
Insertion into metal plastic using a fitting
A crimp coupling is not suitable for a metal-plastic pipe, since when tightened it will simply crush the wall.
To cut into the water supply, a fitting is used. It is attached according to the following scheme:
- A piece corresponding to the size of the fitting is cut out of the pipe.
- Attach connecting rings with nuts.
- Use a calibrator to flare the ends of the pipe to which the tee will be attached.
- Fitting fittings are inserted into the ends of the pipe.
- Move the O-rings to the joints and tighten the nuts.
It is better to screw the ball valve to the fitting outlet in advance and seal the connection. If you do this after installation, it is easy to damage the pipe.
If the pipes are made of polypropylene, you will need a plastic tee with a metal thread inserted into the outlet. To secure it in the cut, you will need a “soldering iron” for plastic pipes.
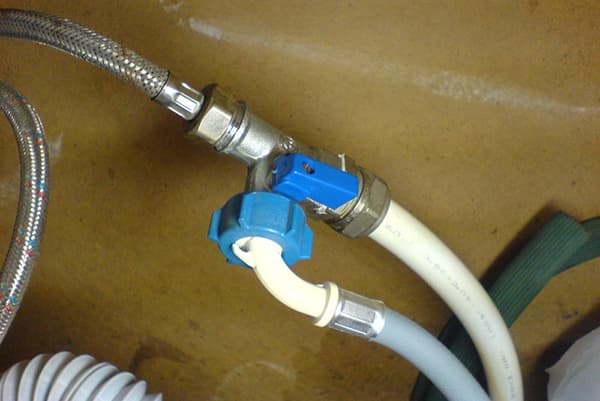
Connection using a tee
The easiest way, suitable for beginners. The insertion is made at the point where water is supplied to the drain tank or at the point where the pipe is attached to the mixer. You will need a plumbing tee equipped with a ball valve. Simply unscrew the water supply hose, screw in the tee and screw the hose to the other end of the tee.
This option has several disadvantages:
- If the supply is carried out through a mixer, you will have to turn off the water to the tap every time you wash.
- The hose from the machine will be in plain sight, which does not look very aesthetically pleasing. You can fix the problem by hiding the hose in a decorative box.
If the option of connecting to a mixer is more of a temporary measure, then the machine can be connected to the point where water is supplied to the tank on a permanent basis. Unfortunately, this option is only possible in combined bathrooms or when the machine and toilet are located close, through the partition.
Connecting a washing machine without running water
If the house does not have running water, you can connect the machine to a large water tank. There are two ways to provide pressure:
- By gravity. In this case, the tank should be located at least a meter above the entry point into the machine. This is how they usually connect the car at dachas or other temporary housing.
- Install and connect the pumping station. This option is more reliable, but is associated with higher costs. Therefore, it is used when permanently living in a house without a centralized water supply.
The tank will ensure stable operation of the machine, just remember to periodically add water.
Where to route the drain hose?
Connecting the drain pipe to the sewer is necessary to remove dirty water remaining after washing.
Bathtub or toilet flush
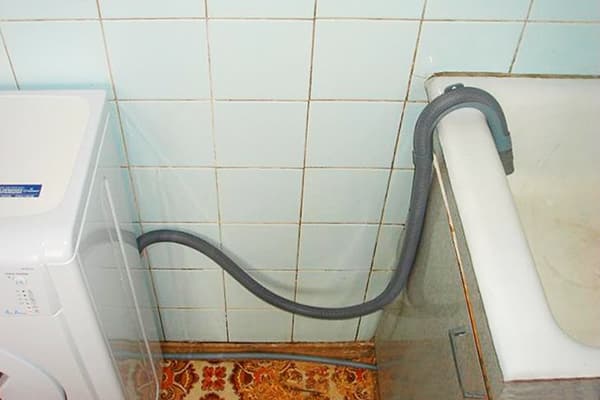
The simplest solution is to drain the washing machine into the toilet or sink. In this case, the sewer system does not require modifications, but it is important not to forget to check the hose before starting washing and during the washing process. Otherwise, you may find that the corrugation has jumped out of its place and dirty water is draining onto the floor.
The outlet end of the drain hose cannot be raised higher than 1 m from the floor, since the machine simply will not be able to create enough pressure to raise the drains to such a height. Also, do not bend the hose at sharp angles or lay it in loops, as this is dangerous due to clogging of the corrugations.

Draining through a siphon
If there is a sink near the machine, it is easy to connect the drain hose to its siphon. To do this, you need to remove the old siphon and install in its place a special product equipped with an outlet for the hose from the washing machine. You can buy such a siphon at a plumbing store.
Another option for this solution is to connect to a tee inserted at the place where the hose from the sink enters the sewer bed.
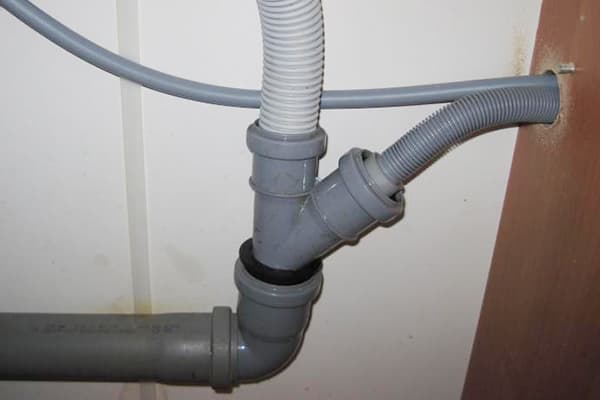
Draining through a sewer pipe
If the sink is located far away, a major connection is made directly into the sink - a horizontal sewer pipe. You will need a tee and a hose seal.
The operating procedure is as follows:
- Cut the deck chair, cut a piece equal to the length of the tee.
- Insert the tee into the cut.
- Place the sealing sleeve on the drain hose. It is needed because the diameter of the bed is significantly larger than the diameter of the drain corrugation.
- Insert the hose into the tee and seal the hole with a sealing sleeve.
For additional protection against leaks, connections can be treated with plumbing silicone sealant.
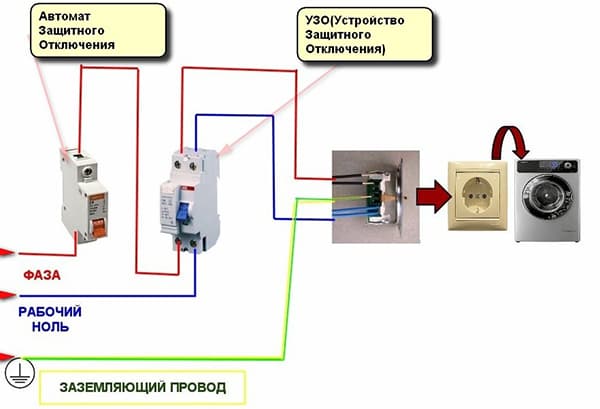
Electrical connection
To provide an automatic washing machine with electrical power, it is connected to a 220 V household network. In most apartments, there are no sockets or electrical wiring in the bathroom. Extension cords are used as a temporary solution, but this option cannot be called convenient and safe. It is much better to draw an additional line and install a socket for the machine.
Safety regulations require that the machine body be grounded. If there is no ground wire in the distribution box, the contact is connected to a grounded bus in the electrical panel. It is prohibited to connect the ground to the water supply or heating pipe, as this can result in electrical injury.
To be more confident, find out how much it costs to hire a professional electrician. If you decide to make the connection yourself, do not forget that according to regulations it is permissible to use copper wires with a core thickness of at least 1.5 mm. The socket in the bathroom must have water protection and a cover to protect it from splashing water.
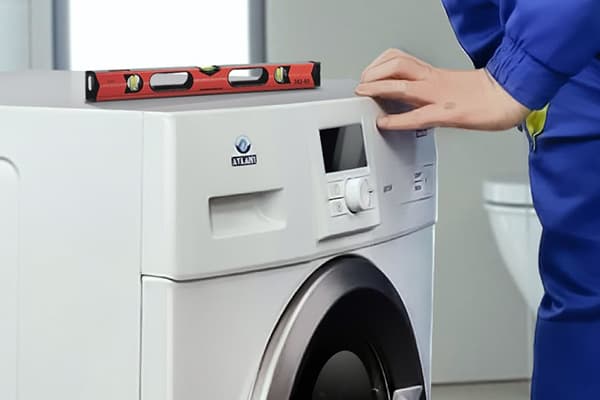
Setting the level
To prevent the washing machine from “jumping” during the spin cycle, it is leveled. To do this, tighten the adjustable legs, controlling the horizontal position of the top cover with a bubble level. The level is placed first along the front wall, then along the back.Then check along the right and left edges.
If the floor is covered with tiles or other hard and slippery surfaces, the machine may vibrate during the spin cycle, even if it is set perfectly. Anti-vibration feet or a rubber mat will solve the problem.

We carry out tests
When you turn it on for the first time, you need to check a few things:
- Are there any leaks in the connections? If so, tighten the nuts.
- Are there any extraneous sounds?
- Is the spin going well?
- Does the outlet or the wire coming from it get hot?
If the machine works well in all modes, you can congratulate yourself on a successful installation. Such an installation will not only save money, but will also help you better understand the operating principle of the washing machine, which will affect its service life.
And if anything happens, you can always contact the service center, they should help you.When we took ours, we called Indesit for advice on connecting