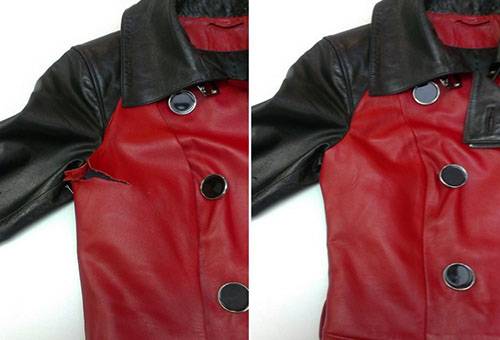
2 ways to seal a leather jacket yourself at home
Of course, repairing a leather jacket is quite a painstaking task, but there is nothing in this process that you cannot do. Without minimal experience in how to seal a leather jacket, your patch may look a little less neat than it would have done at a shop, but doing it yourself will not only save you money, it will also give you knowledge that you can use to repair other leather items. .
Tools
For both methods of repairing a jacket with your own hands, you don’t need anything special: leather for the patch and for the backing, glue and a toothpick.
- If a piece of leather is torn out at an angle, the patch material usually remains in place. If the piece is completely torn out, then you will have to pick up a small piece of similar thickness and texture, equal in area to the resulting hole, unless, of course, you still have the torn piece.
- For the backing, you can use not only leather and suede, but also thick fabric, although the latter adheres less well.
- It will not work to seal a leather jacket with any glue: super glue and some variations of “Moment” harden when it hardens. Use the classic “Moment”: it has sufficient plasticity after drying.
Method 1
The first method of sealing a jacket with your own hands is more suitable if you need to repair a tear at an angle, however, you will need to add a small piece of tape to the tools.
- In order to repair a jacket at home, we need access to the tear not only from the front side, but also from the back side, which means that we will have to break the integrity of the lining. You can rip it along the seam in any convenient place, but it is best to do this along the sleeve in the place where the factory outer seam is located.
- So, first, let’s fix the tear on the front side with tape so that the torn piece fits back as neatly as possible.
Advice
Very sticky tape may leave marks when removed, so stick it to your hand before sealing the tear to reduce its stickiness a little.
- Now we glue a patch made of fabric, leather or suede from the inside according to the instructions for the glue. It is important to lay out the material as evenly as possible so that folds do not form during gluing. Despite the fact that when gluing with “Moment” the force is important, not the pressing time, place a weight on the already glued area to avoid deformation and smooth the area as much as possible. By the way, the patch should extend at least 1 cm beyond the edges of the tear in order to completely cover the hole.
- When the patch is completely dry, remove the tape and use a toothpick to apply glue along the seam of the torn area. You will need very little glue: all excess should be removed with a cloth until it dries.
- The last stage of repairing a jacket with your own hands will be to tint the patch with liquid leather, special paint, or at least regular leather cream to match the product.

Method 2
You can also repair a jacket with your own hands using another tactic: first repair the hole from the inside, and only then seal it on the front side. The second method is more suitable for repairing a jacket with a completely torn piece of leather.
- Provide access to the gap from the inside out in advance, as in the first method.
- Glue the patch from the inside in the same way as in the first method, pressing the tear area with something heavy.
- After the inner patch has completely dried, make repairs from the front side by gluing the outer piece of leather. The most difficult step will be cutting out a piece of leather that is as similar as possible to the outline of the hole. It is important that the piece should not extend beyond the edges of the tear, but at the same time, the places where the edges are not tightly joined can be filled with a small amount of glue.
Advice
The inner patch can be any color, and even for the front patch you can use a piece of a different color if you fill it in with paint or liquid leather. But if you are going to use only cream, then the color of the outer patch should be selected as close as possible to the color of the jacket.
- Once the exterior patch has dried, you can begin painting the repaired area.
These methods differ only in the sequence of actions and will have an equally accurate result if you approach the repair process with patience and accuracy, which will make the patch site almost invisible. And yes, don't forget to sew the lining!
Short and to the point. Thank you!
Taped up my leather jacket. Nothing complicated. Thanks to the author.