How to repair a 220V LED lamp and ceiling lamp for 0 rubles and 2 minutes: step-by-step instructions
Often LED lamps stop working for the most trivial reason - one of the LEDs in the matrix burns out. The damage is simple and easily fixable. You can fix an LED light bulb in just a couple of minutes. To do this, it is not necessary to understand electronics or have a special tool. Easy and quick repairs can be done at home “on your knees”.
How to fix a burnt out LED light bulb - step by step guide
The idea of repairing a burnt out LED light bulb is to restore the circuit using a jumper. The LEDs are connected in series. At the point where one element burns out, a break occurs and the entire lamp stops glowing. You need to remove the burnt diode and bridge the contacts on the board with each other.
Required set of tools:
- stationery knife;
- soldering iron;
- a little solder.
Step-by-step instruction:
- Disassemble the light bulb. For a quick repair, just remove the matte hemisphere from the case.
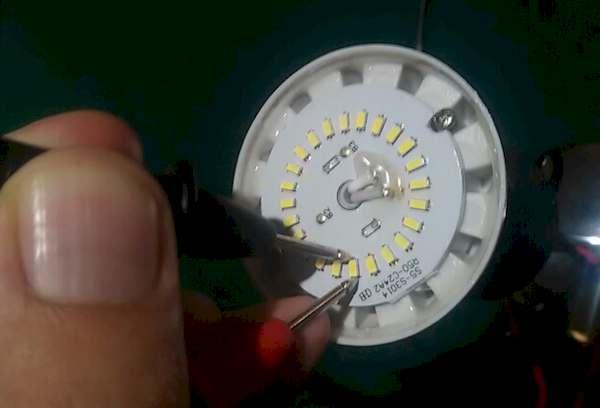
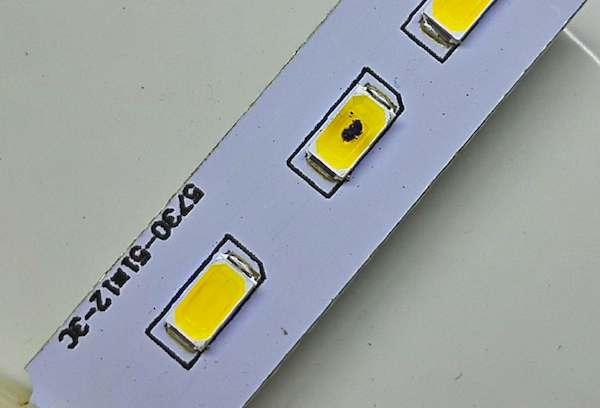
- Identify a burnt out LED. It is usually marked with a black dot in the center.
- Remove the faulty element with a knife.
- Solder this place with tin (leave a drop).
- Place the light-diffusing cap in place.
After some simple manipulations, in 95% of cases the light bulb becomes operational again. How to repair a 220V LED lamp is clearly shown in the video:
Next, let's talk about the nuances of repair.
How to disassemble?
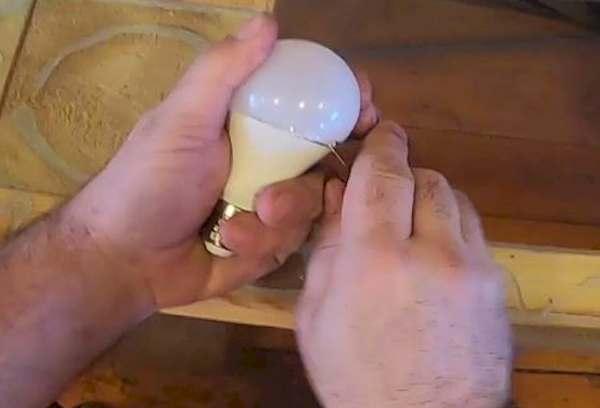
The first step is to remove the matte cap. In some cases, it is enough to pull it sharply to the side (open it at a break), or simply unscrew it. If the cap does not budge, it is most likely stuck on with glue.
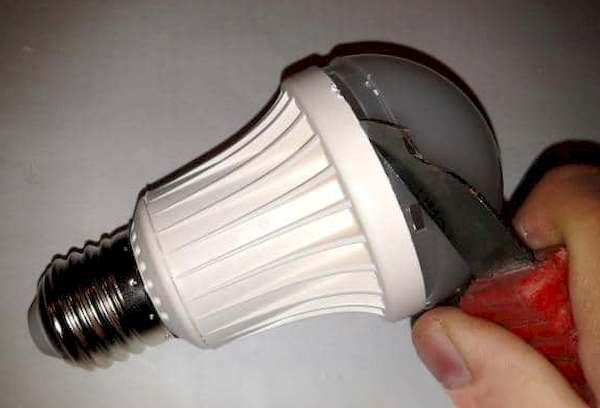
You need to take a utility knife or something similar, insert the blade into the junction of the lamp body and the cap, and go around the perimeter twice. The adhesive sealant in lamps is usually soft and easy to cut. Next you need to pick up the cap.
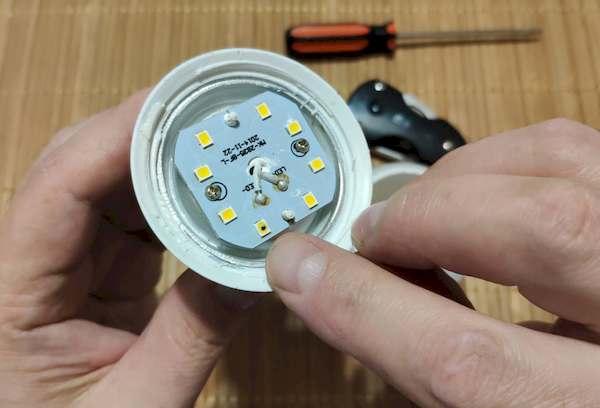
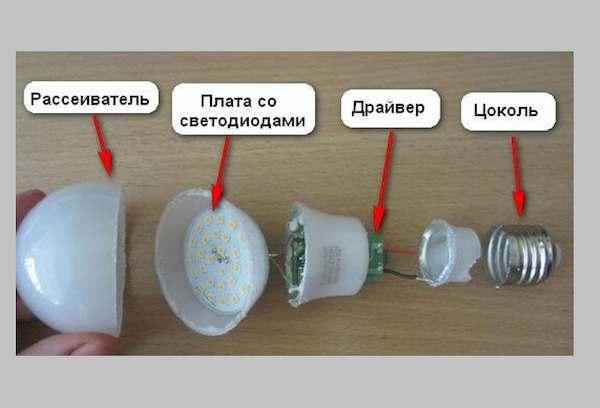
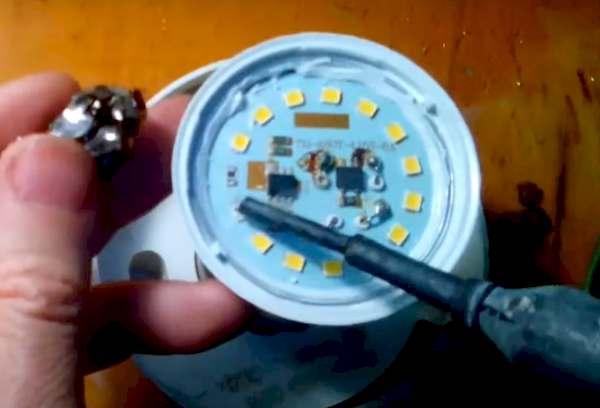
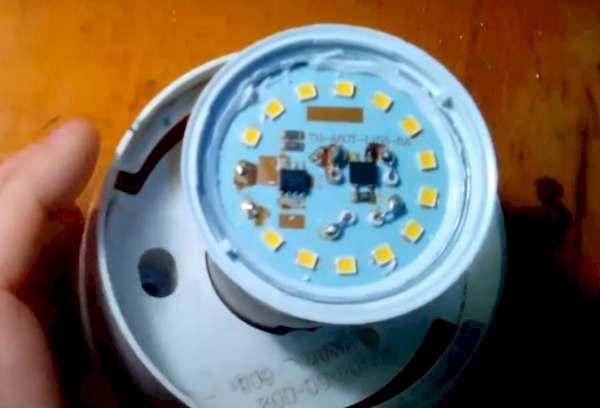
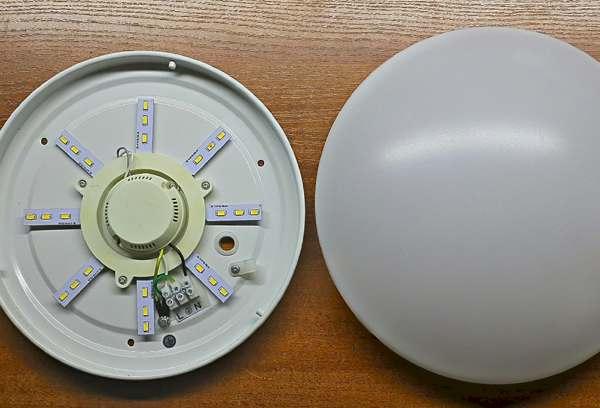
The lamp is disassembled. Approximately the following picture will appear before your eyes:

On top there is a board with LEDs. As a rule, it is screwed to the radiator.
Advice. If you can’t insert the blade between the body and the cap, you can make a small hole with a metal file (file the edge).
How to find a burnt out LED?
A faulty element is often visible to the naked eye. A black dot appears on a burnt-out diode. It can be large and clearly visible or small and faded. Examples in the photo:

We recommend that you take a good look at each diode in bright light. You can use a magnifying glass and a flashlight. Burnt-out LEDs with a faded dot should be marked with a marker so as not to lose sight.
It happens that there are no dots on the LEDs, and outwardly they all look fine. Then you need to carry out diagnostics with a multimeter:
- Turn on the device and select a measurement threshold of 200 volts. Connect the lamp to the network. Measure the voltage at the driver output and find out whether the matrix is receiving power. If there is voltage, then the driver is working and the problem is a faulty diode(s).
- Switch the multimeter to diode or circuit testing mode. Unscrew the lamp from the network.Consistently connect the probes to + and - on each diode on the lamp. A working LED will glow dimly. Thus, you need to identify all defective elements and mark them with a marker.
In this way you can find non-working 3 W diodes. If the diodes are 9 W, you won’t be able to ring them due to insufficient voltage on the probes. You should connect the lamp to the power supply, select the voltage measurement mode of 200 volts, and sequentially pass the probes through all the diodes. When it comes into contact with a degraded diode, part of the circuit will begin to glow.
How to repair?
After the light bulb is disassembled and the defective element is found, the repair itself begins. It is performed in two steps:
- Removing the burnt out element (or elements). You can simply remove a faulty diode by picking it up with a knife or squeezing it with small pliers. When using pliers, removal is more accurate. Clean contacts remain in place, which is convenient for bridging with solder and for more complex repairs of the LED lamp.
- Soldering the jumper. The soldering iron must be turned on. After it heats up, you should drop flux (soldering acid, rosin) onto the cleaned contacts, pick up a little solder and apply it on top - make a conductive bridge. The main thing is that the drop closes two contacts.
The integrity of the circuit will be restored and the lamp will work again. All that remains is to collect it.
How to assemble?
It is clear that LED lamps are structurally somewhat different. Assembly is carried out according to the type of housing. The screw cap is simply screwed on. If it was “torn off” with a click, you should pay attention to the location of the locking slots. When assembling, it is necessary that they coincide with the stopper on the body. Then the cap snaps on.In some cases you need to scroll it a little.

It happens that it is impossible to carefully disassemble the lamp, and the diffuser breaks off. In this case, it can be glued with any glue for plastic. If the sealant is removed, the diffuser may fall off and not hold on tightly. In this case, you should apply a little sanitary sealant along the edges of the case, press the lid, and leave it to “set” for 20 minutes.
How repaired LED light bulbs work - reviews from those who repaired them
Reviews confirm that fixing an LED lamp is really easy if you have a soldering iron at home. Another question is how long does it last after repair?
From the reviews it becomes clear that:
- Alexander: “If you solder a burnt-out LED, the lamp will not work for long. The Chinese already supply more voltage to the diodes than necessary. After repairs, you also increase it. If the light bulb continues to work after a week, consider yourself lucky, it was made by a reputable manufacturer. In my practice, instead of the norm of 2.8 volts, they make 3.4 volts and higher so that the light is brighter.”
- Seryoga: “It’s good if the matrix has only one broken diode. But sometimes there are only 3-5 live diodes. This lamp should only be scrapped. If 1 of 15 diodes is broken, then the only correct solution is to solder it to another of the same kind. Otherwise, the diodes will burn one after another due to overload.”
- Andrey: “I fixed the light bulb, but the next day it burned out again. A pointless activity. I buy light bulbs from Leroy Merlin with a 3-year warranty. If they burn out earlier, they replace them with a new one.”
- Alexei: “In 10 minutes I repaired 3 light bulbs. Six months have passed, everything is working. I regret that I didn't think of this earlier. So many light bulbs went into the trash.But as a child, I repaired Christmas tree garlands with my own hands. As a schoolboy, he put a ball of foil into the socket of a burnt-out light bulb. With each New Year, the lights became fewer and fewer, the remaining ones glowed brighter and burned out more and more often. But the lamps, pah-pah, are still working.”
- Zhenya: “I advise you to take a look right away, if the lamp has 10 LEDs or even less, you don’t even have to waste time on it. The voltage will rise so much that the lamp will not last very long. A breakdown of another LED is possible immediately after switching on. Unless the lamp contains a semiconductor driver with current feedback. Then, after installing the jumper, the current through the LEDs will not change. However, I have never come across such lamps. More often you come across cheap ones with primitive wiring.”
Useful tips
After repairing an LED light bulb, it is advisable to make it so that it overheats less. Actually, overheating causes degradation of LEDs. Having removed the diffuser, you will notice that the board on such a lamp has a characteristic yellow tint, and some of the LEDs look darkened.
The good news is that reducing the heat of a light bulb is not difficult. There are several tricks:
- Make holes for heat removal. You can drill them or burn them with a soldering iron. 5-10 holes measuring 3-5 mm are enough. They should be placed around the circle of the diffuser and in the body near the skirt. The holes will not affect the performance of the light bulb in any way. The only thing is that after the alteration it will need to be used in a dry room. In the bathroom or outdoors, moisture can penetrate through the holes, and then a short circuit will occur.
- Give preference to lamps and chandeliers in which the sockets are directed upward.This way, the heat will rush to the ceiling, and not under the bulb, thereby increasing the heating of the board with LEDs.
How to easily repair an LED ceiling light (chandelier)?
If you can repair an LED light bulb, you can just as easily repair an LED lamp or chandelier. They are designed on a similar principle. Under the diffuser there are diodes connected to each other in series, but not one at a time, but most often in groups of 2-4 LEDs. If one or more diodes degrade, the others will not light up either.
How to quickly repair an LED ceiling lamp - step-by-step instructions:
- Remove the chandelier. The lampshade of lamps is most often removed by moving it counterclockwise or by moving the clamps away. If you can’t get to the fasteners to remove the chandelier from the ceiling, you can use your phone camera to film the gap at the base. This will help you understand the principle of fastening.
- Remove the cover from the housing and look for a degraded LED with or without a black dot. You can test diodes using the methods described above. You can also supply power to the lamp (preferably with a separate unit), and alternately close the contacts of the diodes with tweezers, a screwdriver or a wire with stripped contacts. When the contacts on the burnt out LED are closed, the lamp will light up.
- Remove the faulty elements and close the contacts using a soldering iron and a small amount of solder.
Examples of how you can quickly repair LED lamps (ceiling and wall):
Questions and answers
Is it possible to solder a resistor instead of a burnt out LED?
Theoretically, yes, but the resistor will heat up more than the LED. There is no point in soldering it.
Is it possible to repair an LED lamp (lamp, chandelier) without a soldering iron?
Yes.Instead of a soldering iron, you can use conductive adhesive paste designed for repairing printed circuit boards. It dries within 1 hour. You can speed up the process by drying the paste with a household hairdryer. You can make something like a conductive paste with your own hands. To do this, you need to plan the rod of a simple pencil and mix it with a drop of glue. The lead conducts current well.
How can you use refurbished LED light bulbs?
When used in the kitchen and living room, there is a high probability that the refurbished lamp will quickly burn out. Due to increased heating, the next LED will burn out, and then another, etc. Therefore, it is better to hang such lamps in rooms that do not need constant lighting. For example, in the pantry, toilet, vestibule.
How to fix an LED lamp so that it lasts a long time?
To do this, you will need to make more complex repairs, which will require special tools and experience. Craftsmen have come up with many ways to increase the service life of a lamp with burnt-out diodes. For example, if there is a donor with the same diodes, a replacement can be made. Also, to reduce the load on the diodes, move the driver from a lamp of lower power or increase the value of two resistances in the circuit.
In conclusion, there are several reasons why an LED lamp and fixture stop working. This is not always LED degradation. A short circuit or swelling may occur in one of the capacitors, the microcircuit on the driver may burn out, etc. We did not consider repairs for such cases, as they often require special equipment, knowledge, experience, time and financial investments.Our article is devoted to a simple 2-minute repair of LED lighting fixtures, accessible to everyone. This is an option when the lamp needs to be repaired urgently. Instead of looking, for example, at 1 am, where to buy a spare one.