Saving on heating: how I made a heat-reflecting screen behind the radiator
Warmth in a private house or city apartment is an important component of a comfortable life. A heat-reflecting screen for the radiator will help you save a few degrees in the cold winter (and at the same time save a little on heating costs). I will tell you how I built such reflectors in each room of my cottage, and even hint at how much you can save with the help of this simple device.
What is a heat reflective screen?
Warmth in a city apartment or cottage in winter is provided by a heating system. Hot water or steam, circulating through the pipes, passes through the radiators, heating the metal. The battery gives off heat to the air masses in the room, which are continuously mixed due to convection currents.
To ensure the most efficient circulation, it is recommended to place the battery strictly along the central axis of the window opening.
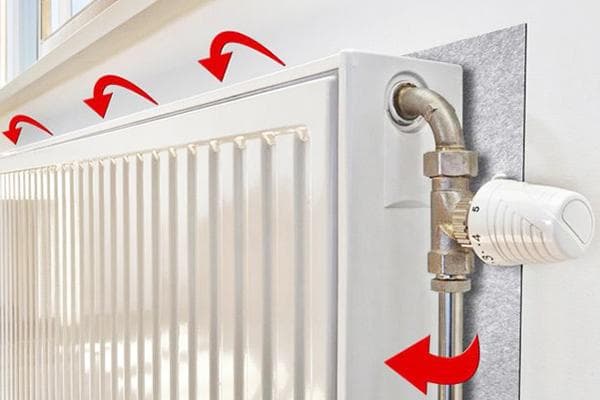
The main disadvantage of the scheme is that part of the heat escapes through cracks in the windows, open vents, and is also spent on heating the walls (and through them - the streets). The idea of saving heat using a reflective screen is to return into the room the heat that comes from the radiator to the outer wall.
A thin layer of metal foil can reflect at least 95% of the heat, reducing losses.
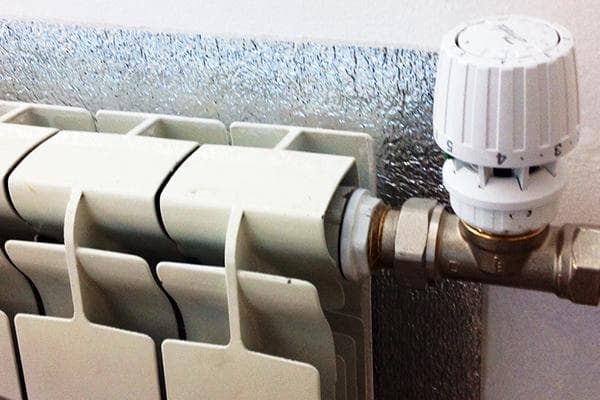
It is not enough to stick foil on concrete or brick. The metal has good thermal conductivity, so the foil will heat up and then warm up the wall.To prevent this, a layer of material with low permeability to heat must lie between the wall and the metal. That is why I decided to build a screen from foil foam.
Is it worth the candle: pros and cons of installing a screen
On forums dedicated to home heating issues, there is a constant debate between supporters and opponents of installing reflective screens behind radiators. Some participants in such debates say that screens provide a real increase in temperature and savings in heating costs. Representatives of the other camp are confident that screens have more of a psychological effect.
I have collected the main arguments of both sides in a table:
| Pros | Cons |
|---|---|
| The cost of a reflector (if you do the installation yourself) is low. With the cost of a roll of insulation being 18 sq. m 1.5 thousand rub. You can equip an entire house with screens for 2–3 thousand rubles. | Due to the low efficiency of the screen, the cost of creating it is money thrown away. |
| It’s easy to build a screen; a person without special skills can handle it. | If you do not understand what and how to do, you can disrupt the air flow and reduce the efficiency of the heating radiator. |
| The screen saves 5–7% of the energy emitted by the radiator. | The screen only protects 5% of the external wall of the room. Through the rest of the area, not protected by a reflector, the street is still heated. |
| The temperature in a room equipped with a heat reflector will be 2–3 °C higher, all other things being equal. | Often there is no objective evidence of savings, and all talk about effectiveness is based on the “placebo effect.” |
Taking into account the ratio of the costs of making a screen and the cost of paying gas bills for a boiler in a cottage, the option of creating reflectors behind the batteries seemed promising to me. Therefore, I decided to spend money on one roll of insulating material, make screens in one or two rooms, and then evaluate the effectiveness of the idea.
What materials are suitable for the screen?
The first problem that had to be solved was the choice of material from which to make a heat-reflecting screen. More precisely, two materials: foil and foamed polymer.
There are several criteria for choosing reflective foil:
- The degree of surface polishing. The smoother the metal layer, the more heat will be reflected into the room. Matte foil for the screen is not suitable.
- Presence of an adhesive layer. The self-adhesive variety is more expensive, but you don’t have to bother with the selection and uniform application of glue.
- Reasonable price. It is best to take aluminum foil in terms of price and quality ratio.
The foil can be installed either in one layer or in two (on both sides of the thermal insulation layer). As a rule, the distance from the wall to the radiator will not allow installing two layers, and the effectiveness of single-layer shielding will not be much inferior to the option with two layers.

Insulation material
The purpose of insulating material is to create a barrier to heat. The most effective insulators are porous materials whose cells contain air. There are many materials with this structure on sale.
We make a choice based on the properties:
- thermal conductivity – within 0.05 W/m*°C.
- thickness – from 0.5 cm to 1 cm.A thinner material will not create a reliable barrier to heat, and a thicker layer is unlikely to be placed in a tight space behind the radiator;
- sufficient plasticity and flexibility. Tiled materials (such as polystyrene foam or mineral wool) will be inconvenient to use.
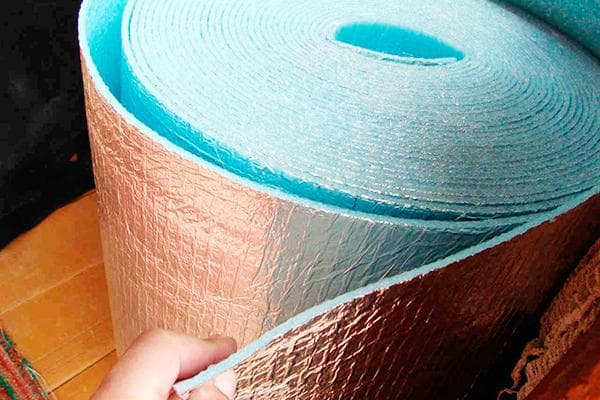
After analyzing the properties of materials presented on the domestic construction market, I settled on foam foam, covered with foil on one side. This is a foamed roll material on a polyethylene base. The main advantage of penofol is its closed air pores (due to this feature, the material does not absorb moisture). Other benefits:
- presence of a layer of foil;
- ease of working with penofol;
- affordable price per 1 sq. m.
There are recommendations when cutting penofol to add 10% to the radiator area for each dimension. But since many experts say that extra centimeters of foil material only spoil the appearance and do nothing to save heat, I decided to cut the screens strictly according to the size of the radiators.
How to make a reflective surface with your own hands?
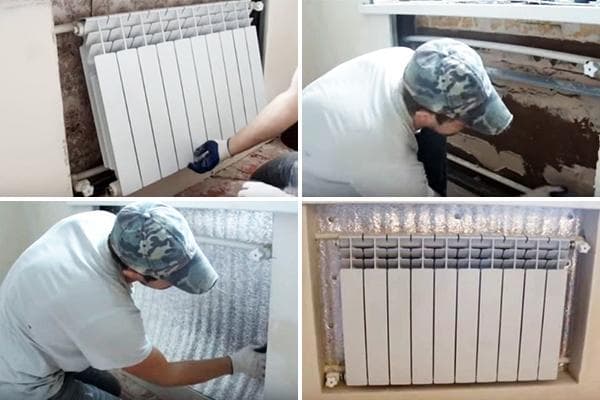
It was decided to attach the reflective material to “liquid nails.” Having purchased a roll of penofol, a bottle of glue and a gun for work, I got to work. Installation didn't take long.
All operations can be described by the following algorithm:
- First I removed the radiators from the walls. This work is best done with an assistant (I worked with my nephew).
- Before installing the screen, we were able to carefully inspect the walls. Several small chips and cracks were found, which my nephew covered with putty.
- While my nephew was putting putty on the walls, I was cutting out penofol. The material can be easily cut with a construction knife.
- On the putty and cleaned wall, we glued penofol with “liquid nails”.It’s convenient for two people to work: one applies the glue, the other sticks the reflectors.
When the composition has dried, having firmly glued the screen to the walls, all that remains is to replace the brackets and hang the batteries back.
I hope that my experience will be useful to you in your struggle to save on heating. Good luck with your work!