Learning how to properly sterilize jars in the oven and in a pan of water
Real housewives know that a summer day feeds the year, so they try to make a lot of preparations. And in order for the work to proceed quickly, they prefer to sterilize the jars in the oven. This method allows you to reduce your time in the kitchen by several hours. The main thing is to follow simple rules so that the dishes do not burst.
General principles for sterilizing jars in the oven
Microbes die under the influence of high temperatures. If at least one of them gets into the jar with the preparation, the contents will deteriorate and the lid will swell. Regular cleaning is not enough; only high-quality heat treatment is needed. For sterilization at home, use steam, boiling in water, heating in an oven or microwave.
It must be remembered that glass is a fragile material and requires special handling. It is because of the fear of jars exploding that many do not risk using the oven. But in vain. It has the undeniable advantage of good capacity and allows you to process an impressive amount of dishes of any size in one go.
How long does it take to sterilize a jar?
Experienced housewives determine the duration of the procedure by eye: the glass on the oven fogs up and then clears, which means it’s time to take out the jar. But for beginners, it is still better to note the exact time. Small (0.5 and 1 l) jars are sterilized faster, 3 l - longer.
On average, oven sterilization lasts:
- 10 minutes – for 0.5 l cans;
- 15 minutes – for 1 liter;
- 20 minutes – for 2 l;
- 25 minutes – for 3 l.
If all the jars are different, it is not at all necessary to take them out one by one. The main thing is that they are not in a hot oven for longer than 30 minutes. This is the maximum time.
Temperature
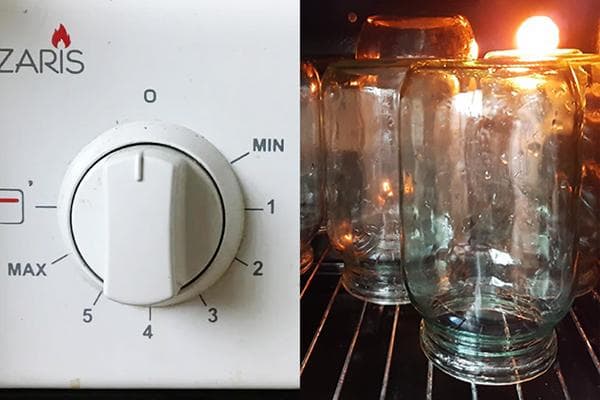
To sterilize glass containers in the oven, a temperature of 120 degrees is sufficient. However, many set 150 degrees - this is the maximum permissible limit.
Modern electric ovens heat up faster than gas ovens (3-4 minutes versus 15-20). Therefore, to sterilize jars in them, it is important to increase the temperature gradually: first 100 degrees, after 5 minutes - 120, after another 5 - 140-150.
6 rules
In order for the jars to be properly sterilized and not burst, it is enough to remember and follow 6 rules:
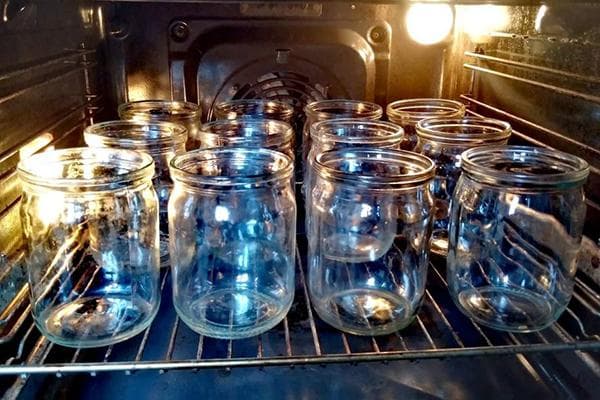
- The procedure is carried out only with perfectly clean and intact containers without chips. It is advisable for the jars to be dry, but it is acceptable to leave them damp.
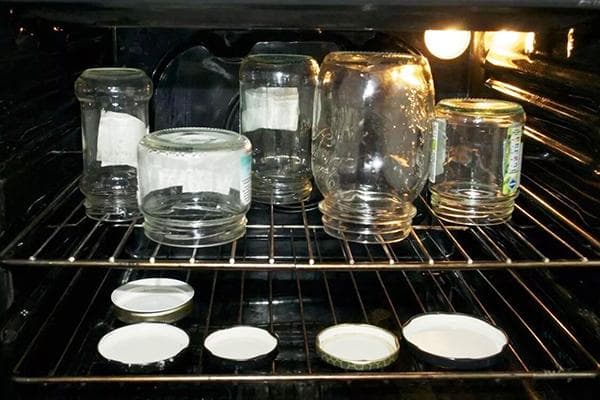
- For sterilization you need a wire tray. Cast (solid) can only be used in a special way: it must be filled with water to a depth of 2 cm, and the jars must be placed bottom down.
- It is important that the containers do not touch!
- You need to put the jars in the oven at the same temperature: cold - in cold, hot - in hot.
- To remove sterilized dishes from the oven, you need to arm yourself with oven mitts or a towel. They must be dry.
- You need to grab hot cans by the sides. If you grab it by the neck, it may break off.
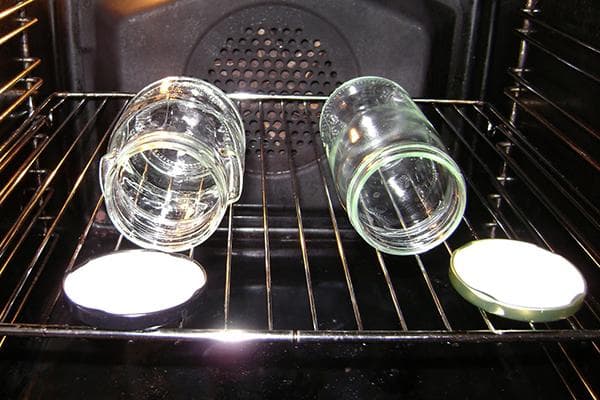
It doesn’t matter how you sterilize empty jars – bottom up or bottom down. Microbes die from the heating of the glass, and the heat in the oven comes from all sides. True, when installed on the bottom, a harmless but unaesthetic white coating may appear below.
Step-by-step instruction
Any sterilization begins with preparing the dishes.First of all, the jars need to be inspected for chips on the neck. Scrap is not suitable for workpieces, because air can leak even through small holes and the product will deteriorate.
Next you need to clean the glass with baking soda or any detergent. It is important to do this efficiently, paying special attention to cleaning the bottom inside the jar and the threads on the neck.
To clean the jars quickly and thoroughly, first soak them in warm water for 3 hours. And for cleaning, take a new foam sponge with a rough surface.
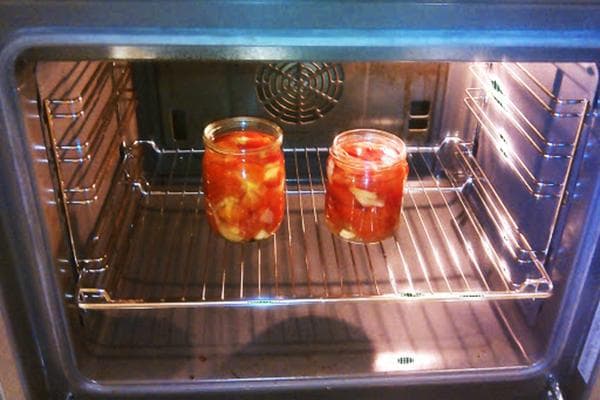
Now you can start sterilizing in the oven. Step-by-step instruction:
- Place cold jars with cooled preserves, as well as those still damp after cleaning, on a baking tray in a cold oven. Dry jars, as well as jars with hot preparations, can be placed in a preheated oven.
- Make sure there are small gaps between the containers.
- You can place screw metal lids (without rubber bands) nearby.
- Sterilize jars at 150 degrees for 10-25 minutes.
- Turn off the oven and let it cool slightly (5-10 minutes).
- Remove the dishes with dry oven mitts, grasping them by the sides. Immediately place the jars upside down on a table covered with a clean, sterile cloth.
It is not recommended to sterilize lids with rubber bands in the oven. For them, it is better to use the standard method - boiling for 5 minutes in a pan of water.
Sterilizing jars in a pan of water
This is the oldest and most proven way to prepare jars for blanks. It is popular to this day, because it requires only a pan and water, and the procedure itself can be carried out even on a stove or fire.
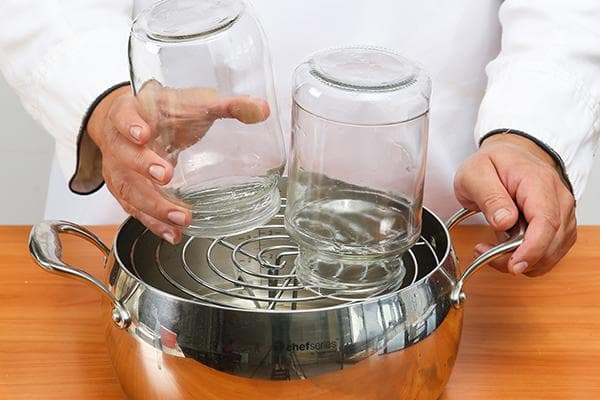
There are 2 ways to sterilize jars in a pan of water: boiling and steam.
- Boiling. Clean jars are sterilized by first filling them with water up to their shoulders. The same amount of water should be outside in the pan. The duration of the procedure is 15–20 minutes. After processing, the hot preparations are poured immediately and the lid is immediately rolled up.
- Steam sterilize. For the procedure, in addition to a pan of water, you will need one more device - a special metal ring with a hole for the neck of the jar. It needs to be placed on a pan of boiling water of a suitable size, and then clean jars should be placed one by one and sterilized for 10-25 minutes (depending on the size, the same time for processing in the oven). The ring can be replaced with a metal sieve or wire rack. The main thing is to ensure the stability of banks.
Other sterilization methods
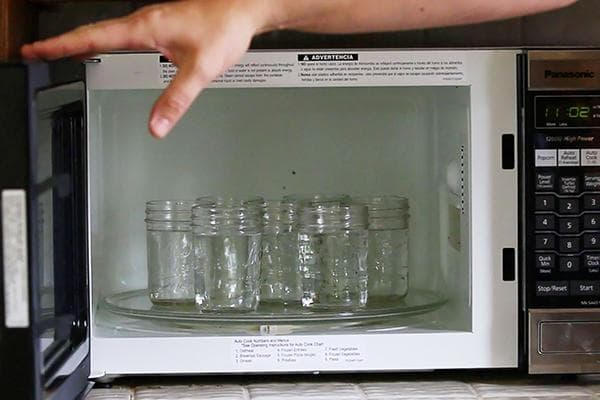
Jars for blanks can be processed not only using the oven and a pan of water, but also in the microwave. Or just wipe with vinegar. In the first case, pour some water into the jar and set the timer for 3-5 minutes at a power of 900-1000 watts. To sterilize with vinegar, use 70% essence - either wipe the walls with long tongs and cotton wool, or prepare a solution, which is alternately shaken in lidded jars. Proportions – 7 tbsp. spoons per 500 ml of cold boiled water.
The vinegar solution can leave a chemical burn, so this sterilization is carried out with rubber gloves.
So, there are different ways to prepare jars for blanks at home. Sterilization in the oven is considered one of the fastest methods and is especially helpful when there is a lot of work. But in general, all of the options listed are excellent for eliminating germs and allowing you to keep food in jars intact for a long time.