Quick and easy installation of curtain eyelets with your own hands: just know the design
There are many options for decorating a window with fabric. Curtains with eyelets are considered one of the most progressive types. The simple installation of eyelets with your own hands is captivating. For the most part, the rings snap easily into the hole without any tools.
Installation principle
Modern eyelets are made primarily of plastic. They are structurally simple and easy to install at home:
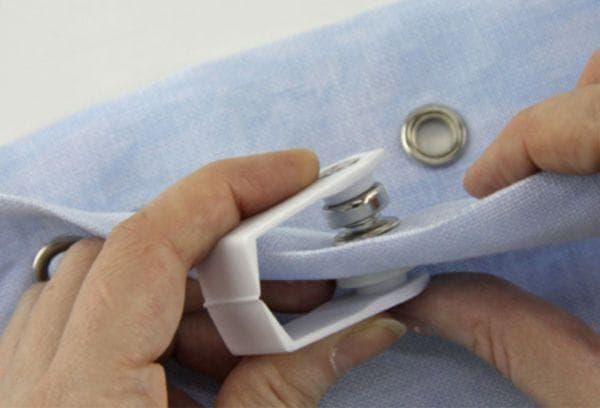
- The most common type of curtain eyelets consists of two parts. The back part slides into a hole made in the fabric, and the front cover snaps into place with a firm hand press. Thus, the matter is securely clamped inside the box in the form of rings.
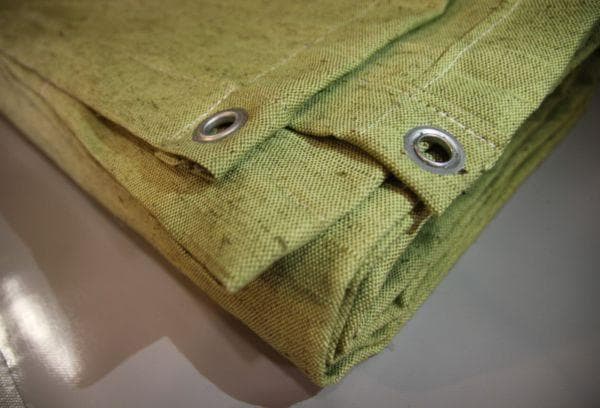
- Less commonly, metal eyelets consisting of a sleeve and a washer are installed on curtains. Such loops, only smaller in size, can be seen on leather belts and shoes. They are installed on awnings, tarpaulin fabric, and are able to withstand heavy loads. Installing them without tools is more difficult. The principle of installation is to flare (flatten) the sleeve (leg) around the washer. The eyelet is threaded through the hole on the curtain from the face. From the reverse side, a washer is put on the sleeve, and the leg is flattened, clamping the washer together with the fabric.
DIY installation tool
Many devices have been invented for installing eyelets.They are in demand in factories and sewing studios, where speed and accuracy of work are very important. Conventionally, they can be divided into 2 groups:
- Punchers. Used to make holes in fabric of a given diameter. The edges are as smooth as possible. Some punches cut through fabric, others burn through.
- Presses. Used for flaring metal bushings. There are manual mechanical, semi-automatic and automatic. They often perform several functions at once and can place over 1000 rivets per hour. Most hand setters are designed to handle small diameter rivets.
There is no need to buy special devices for one-time installation of eyelets on curtains. They are very expensive and easy to replace.
At home, you can install the grommets yourself:
- sharp scissors;
- centimeter, ruler;
- simple pencil.
Installation step by step
Eyelets serve to reinforce holes in the fabric. They replace classic hinges. The cornice goes through the grommets. Being made of plastic, they slide easily and silently. Such rings can be installed on any fabric, except very heavy and bulky ones.
Step-by-step instruction:
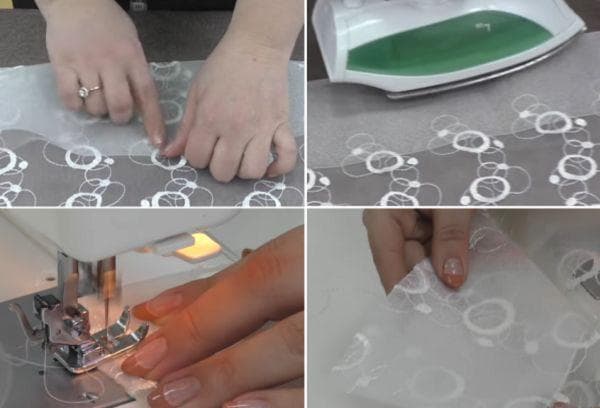
- Wash and iron the fabric.
- Reinforce the grommet installation area with special grommet tape. You can simply fold the fabric and hem it. The width of the strip is calculated by the formula: outer diameter of the eyelet + (3-6 cm * 2).
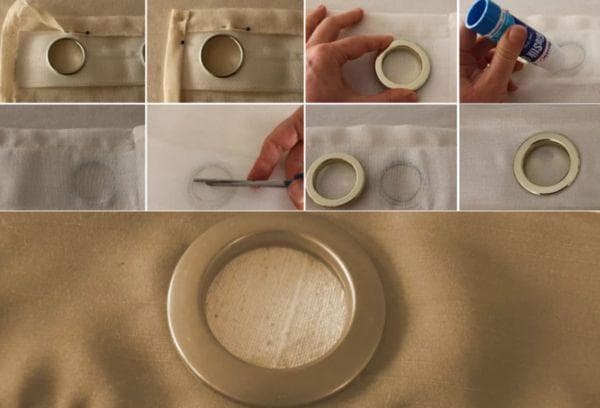
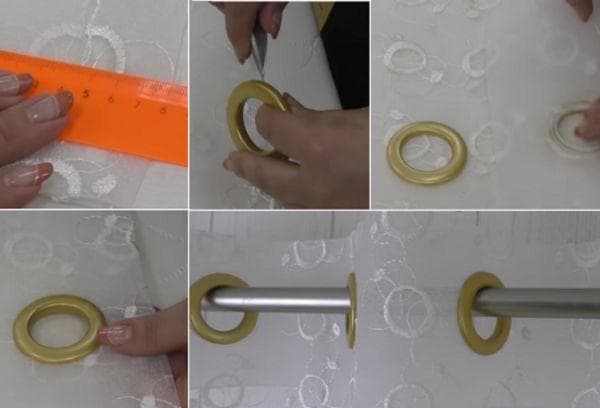
- Attach the first eyelet to the fabric, moving 2-4 cm from the edge of the curtain. 3-6 cm of reinforced fabric should remain at the top and bottom of the ring.
- Use a simple pencil to outline the internal section.
- Repeat the same from the opposite edge of the canvas.
- Measure the length between the centers of the two circles.
- Divide the resulting length by the number of remaining eyelets.
- Apply markings with a pencil according to the obtained value (mark the centers of the holes for the eyelets). For example, the distance between the centers of the first and last grommet was 120 cm, there are 6 grommets left. Divide 120 by 6, we get 20 cm. We put marks every 20 cm.
- Attach the eyelet to the mark so that it is located exactly in the center. Trace the inner circle.
- Repeat the same with other marks.
- If the fabric frays, treat the intended circle along the contour (plus 5 mm) with a special fastening liquid or PVA glue.
- Cut holes along the intended circle plus 1-2 mm.
- Open the eyelet by inserting a sharp, thin object into the gap.
- Place the back part of the part from the wrong side. Straighten the fabric so that there are no wrinkles.
- Place the front part of the eyelet and press firmly with your palm until it clicks.
Video of a master class on installing plastic rings on tulle:
If necessary, the plastic eyelet can be opened and reinstalled.
Instructions for metal eyelets
Metal rings are considered stronger and more durable. But they are more expensive than their plastic counterparts and require more care during installation.
There is no room for error when installing a metal grommet. You will only have one attempt to install the ring correctly. It is recommended to purchase 1-2 more eyelets and practice on an unnecessary piece of fabric.
It is advisable to purchase metal rivets complete with a punch with a matrix.
If the tool is not in the kit, you will have to look for a suitable object for flattening. Not everyone can make a press at home.We recommend replacing the punch with an ordinary metal ball with a diameter slightly larger than the bushing or a bolt with a large round head. You will also need a hammer and a piece of linoleum or other soft material to protect the face of the grommet from impact.
It is not recommended to flatten the sleeve of the pliers. The tool will leave dents in the trim ring.
Progress:
- Insert the part of the eyelet with the leg into the hole in the fabric. The leg should be on the wrong side.
- Place the area to be treated on a flat, hard surface.
- Place something soft (linoleum) under the “face” of the eyelet.
- Carefully straighten the fabric. To fix it, you can use needles or tape.
- Place the washer on the leg with the curve up.
- Apply a die punch or other flattening tool to the leg. It should be exactly in its center.
- Keeping the hammer straight, strike the punch forcefully several times. The leg will flatten and fix the ring.
You can watch the installation process in the video:
How to sew curtains with eyelets yourself?
Seeing how easy it is to make this type of loop, many housewives get excited about the idea of sewing curtains with eyelets “from scratch.” Choosing the fabric yourself is always more pleasant. And it’s more profitable for the family budget.
First of all, calculations are made. Need to:
- Calculate the height and width of the curtains. The width is calculated using the formula: cornice length * 2. Plus 6-8 cm for hems. The height of the curtain will be: the distance from the floor to the cornice + 5 cm hem at the bottom + 3-6 cm + the height of the bar + 1.5-2 cm hem on the bar. The height of the bar is the outer diameter of the eyelet + (3-6 cm *2).
- Multiply the width of the curtain by 6. You will get the minimum number of loops. You can put more rings. But the total number must be even.
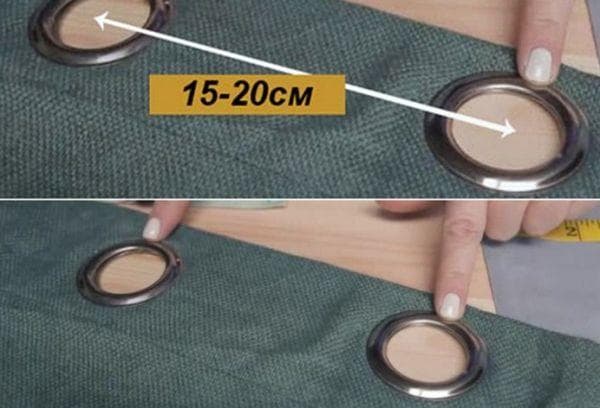
- Calculate the distance between the loops.The accuracy of subsequent calculations is very important. An error of even 1 cm can ruin the entire appearance of the curtain, leading to its skew or uneven folds. When calculating the distance between eyelets, only the internal diameter is taken into account. The optimal distance from the center of one ring to the center of another is 15-20 cm.

- Indentation from the edge of the curtain. The first ring is installed at a distance of 2-4 cm from the edge of the curtain. This is the distance between the edge of the canvas and the edge of the ring (not the center). That is, to 2-4 cm you need to add another half of the diameter of the entire eyelet. The same indentation is left after the last loop.
- Distance from the top of the curtain. To make the curtain look neat, leave a free edge of 3-6 cm on top. Half the diameter of the ring is added to the selected value. This way its center is marked.
Instructions
After making preliminary calculations, fabric for curtains is purchased. When choosing it, it is important to pay attention not only to the appearance, but also to the technical characteristics. At a minimum, the material should not shrink much and crumble heavily on the cuts.
- Preparing the canvas. First of all, the fabric is washed and ironed. Most fabrics shrink after the first wash. If you wash a finished product, it can become very warped.
- Cut and hem. If the canvas is whole, it is cut in half. According to calculations, the fabric is folded and hemmed along all edges except the top.
- Sewing straps. On very fragile and thin fabrics, grommet tape is first applied. It is glued using a heated iron, retreating 1.5-2 cm from the edge. Next, a fold is made. The raw edge is hidden under the tape. The strip is steamed and stitched.
- Applying markings and installing eyelets (see instructions above).
Master class on sewing curtains:
Questions and answers
Question: How to choose the right eyelets for curtains?
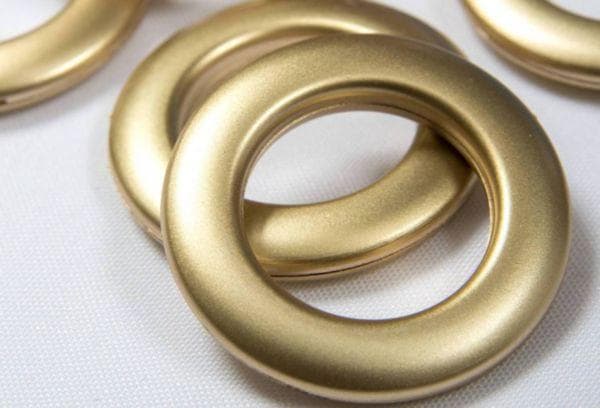
Answer: Rings are bought last. For heavy thick curtains, choose strong metal rivets, for all others - plastic ones. In order for them to slide easily along the cornice, the cross-section should be 1.5 cm larger than the cross-section of the cornice. Gray round rings are considered universal. They match any curtain colors. For plain fabrics, original shapes and colors are possible: stars, hearts, gold-plated eyelets with stones and others.
Question: How to wash curtains with eyelets?
Answer: Curtains with rivets are recommended to be washed by hand or in a delicate wash bag. The speed must be low, otherwise the plastic or metal may be scratched. Some housewives remove plastic parts before washing. But in this case, the edges of the holes in the fabric may become very frayed. You need to overlock them or stitch them with a needle and thread.
Installing eyelets on curtains is easy. Plastic rings are attached without special tools. Installation is done by yourself. It is only important to make the markings correctly and carefully cut holes in the fabric. You don't need a lot of experience here. With the help of step-by-step instructions, any housewife can cope with the task.