You don’t have to throw away such a Christmas tree until June: how to make and attach a Christmas tree from a garland to the wall?
This year I firmly decided to put up a garlanded Christmas tree on the wall. I thought everything was simple. But no. I had to try different ways. I'll tell you what happened.
Outline of a Christmas tree on a wall of garlands
Inspired by the Christmas tree made of garlands in the supermarket, I got down to business. The question immediately arose about what to actually attach the wire to. I started scouring the Internet and found a wonderful solution - special clips on the wall for New Year’s garlands.
The clips look like small plastic hooks. Double-sided tape is glued to the back side and then pressed against the wall. I was won over by reviews on the Internet that the hooks are easy to remove and do not leave marks on the wallpaper. When you pull them parallel to the surface, the tape stretches and comes off. Can withstand up to 2 kg. Invisible on the wall.
I found a set of hooks in a regular supermarket. They're called 3M Command. For 20 clips I paid 270 rubles. And then I did something stupid. I started attaching the hooks by eye - one on top, two on the sides, then the third row, two hooks closer to each other. It should have turned out like this:
In fact, expectations and reality did not coincide. To put it mildly. The tree was disproportionate, the garland was sagging. It looked like my three-year-old son had drawn the outline of the tree. Well, what can you do, it's your own fault. It was necessary to first make markings on the wall, and then glue the clips. I had to take everything off.
The clips for the garlands really didn’t leave any traces. You just need to pull the tape slowly.Once I miscalculated the force, and the top layer of wallpaper came off a little. In general, I took them off longer than I glued them - an hour, if not more. The clips could have been used again, but there were only a couple strips of tape left. I went looking for replacement stickers and couldn’t find them. I didn't want to buy a new set. Denek thought about how to attach the garland to the wall, and came up with this.
Zigzag Christmas tree on the wall
It would be easier to lay out the Christmas tree on the wall in a zigzag pattern, I thought. I decided not to buy new hooks, but to attach the garland to thin 4 mm finishing nails. They are invisible and leave microscopic holes. Then I’ll pull it out, and the wallpaper will remain intact. Fortunately, my wall is foam concrete. Therefore, there will be no problems with driving nails.
I outlined the following work plan:
- Drive a nail into the place where the top of the tree will be. Tie a rope to it and throw it down.
- Step back from the rope 30 cm in one direction and the other. Drive in a nail (bottom of spruce).
- Tie the dangling rope to one bottom nail. Take the second rope and connect the top and the second bottom nail. You will get an even triangle.
- Next you need to drive in a dozen nails with equal spacing on the sides. With a line marked out on the rope, this is easy to do.
- Fasten the garland from the top nail to the bottom with a zigzag (making one turn on each nail).
- You can insert the nails very thickly. The tree will turn out great. The main thing is that the garland is long enough.
And everything would have been fine if the wife had not come and expressed her categorical “against”. I had to abandon this wonderful method. Well, never mind, when I have some free time, I’ll make a Christmas tree like this in the garage. And for the house I found another, third way.
Christmas tree made of garland and sticks
The third option, in my opinion, is a win-win. There is no need to think through a tricky fastening system.You only need one nail (I still managed to drive one). I saw this life hack for concrete walls. The wallpaper is cut crosswise, superglue is squeezed onto the wall, and a paperclip with a bent hook edge is inserted into it. Next, the wallpaper is glued into place. Nothing is visible, there is a hook. You can hang anything weighing up to 2 kg. But let's get back to the topic.
The idea is to wrap the garland around a sort of rope ladder that tapers towards the top.
The result is the same shape of a Christmas tree, which can be hung on just one nail or hook. It can be easily removed and stored in the pantry until next year. You can hang tinsel and whatever toys you want on sticks.

I’ll tell you how I made a Christmas tree from a garland on the wall step by step:
- I found suitable sticks. I just had a couple of large branches left in my yard after pruning the trees.
- I used a handsaw to cut the branches to the thickness I needed. I tried to choose the most direct ones. It turned out 5 branches about a meter long. I removed the branches from them.
- I brought it home and rinsed it off with water. It would have been possible to remove the bark, but I didn’t bother.
- Next it was necessary to adjust the sizes. To get a slender triangular tree, I cut the branches like this: 15 cm, 25 cm, 35 cm, 45 cm, 55 cm, 65 cm, 70 cm. Total 7 sticks.
- I took a clothesline 3.5 m long. I folded it in half and spread the ends to the side. I started to tie the sticks, but realized that the rope was constantly “moving away”. To keep it taut, I made a loop around the table leg.
- I tied the shortest branch on one side and the other at a distance of 15 cm from the middle of the rope (loop).
- I tied a 25 cm stick at a distance of 15 cm from the first one. I made sure that the sticks formed a triangle. I knitted knots, stepping back 3 cm from the edge of the sticks.
- So I tied all 7 sticks.Ideally, it would be possible to run two more thinner ropes from the top of the head to better secure the sticks together. But I didn't.
- The design turned out to be weighty. Therefore, the finishing nail had to be replaced with a dowel nail. If you have an unreliable attachment, I advise you to take thin and light poles. Keep in mind that the weight of the rope, garland and toys will be added.
- I hung a Christmas tree made of rope and sticks on the wall. And then the best part – decoration.
- I let the garland go along the rope in a triangle (I just wrapped it around it). It turned out perfectly smooth. Then the children joined the process. They wrapped the sticks in green tinsel, tied toys, snowflakes and basically everything that was in the box to them.
How to decorate a wall-mounted Christmas tree beautifully?
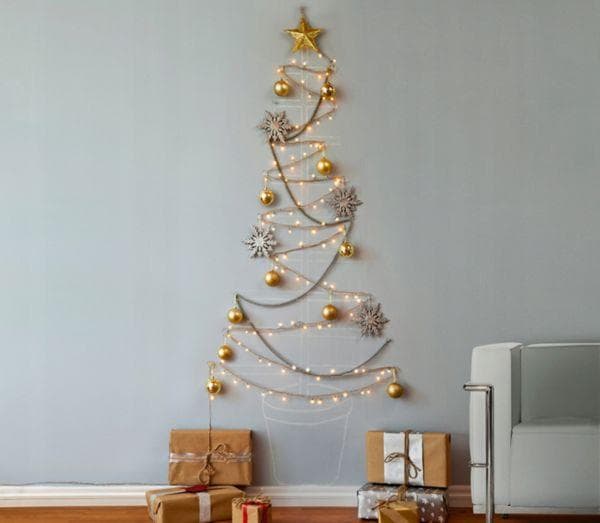
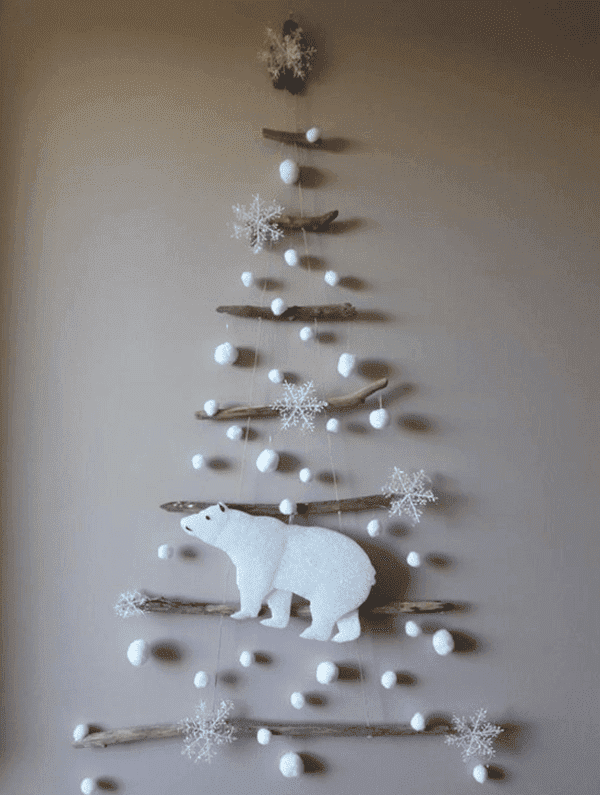
As a child, I loved decorating the Christmas tree. I consider myself a kind of esthete. I was specifically looking for ideas on how to make a Christmas tree from garland beautiful and fashionable. I liked these options:
Christmas tree in the snow with a polar bear:
Christmas tree covered with artificial snow, white and metal toys:

Christmas tree in the snow with birds:

Unfortunately, it was not possible to bring them to life. The children did not appreciate the designer's delights and decorated the Christmas tree to their own taste. Well, maybe they will be useful to someone else.
There are still a few weeks until the New Year, but our Christmas tree is already flashing colorful lights on the wall. The children rejoice and write letters to Santa Claus. I'm finally happy myself. It turned out even better than in the picture. The budget was saved by a thousand. The forest was not damaged. Your wife won't be nervous about needles all over the house. He did something useful with his own hands. You don’t have to throw away such a tree until June. I advise everyone!
Although the author writes about the New Year tree, the tips turned out to be useful for decorating the wall for my daughter’s birthday. We attached garlands to the wall and various decorations.