Remade the LED light bulb. Now it lasts 3 times longer and shines 2 times brighter
Let there be light! I’ll tell you how I made an LED light bulb that lasts for 3 years and is not going to die. At the same time, it shines twice as brightly. The conversion is very simple. I'll describe it in detail.

The secret to longevity of LED lamps
I noticed this thing. LED light bulbs are positioned on the market as the most reliable, economical and durable. Manufacturers promise that they will last 10 years. In fact, they work exactly until the warranty expires. Although they could shine longer.
The Chinese save on everything they can - driver components, LEDs, board and case materials. As a result, the light bulbs become overloaded and overheat. LEDs are operated in extreme conditions!
I noticed this when another light bulb stopped shining after a year. I decided to take it apart and see what the problem was. It turned out that the resistors and capacitors were selected so that the LEDs worked at their full power. Not surprisingly, one of them burned down.
Disassembly
It was decided to extend the life of the light bulb in the most barbaric way. I'll start from the beginning - with disassembly.
- Take a sharp knife. We wear gloves to avoid cutting ourselves.
- We put the light bulb on the table.
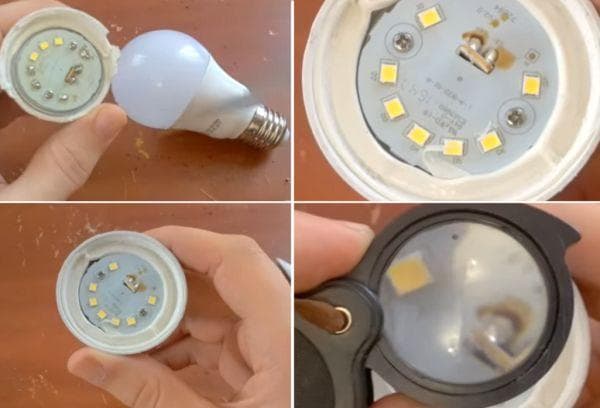
- We insert the knife blade into the microslot between the diffuser and the middle part of the lamp.
- They are connected by some kind of sealant.
- Lightly press the knife on top and roll the lamp over.
- A couple of minutes, and the sealant is cut off, and the shade comes out of the latches of the middle part.
- Under the cover, the LEDs connected in series on the board will appear.
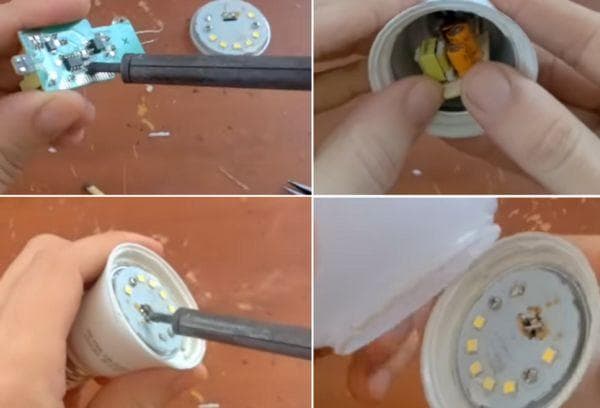
- Unscrew 2 screws and unsolder. Cut hot melt glue in a circle.
- We take out the board by prying it with a knife.
- Behind it is a driver that can be pulled out with your fingers. That's it, the light bulb is disassembled.
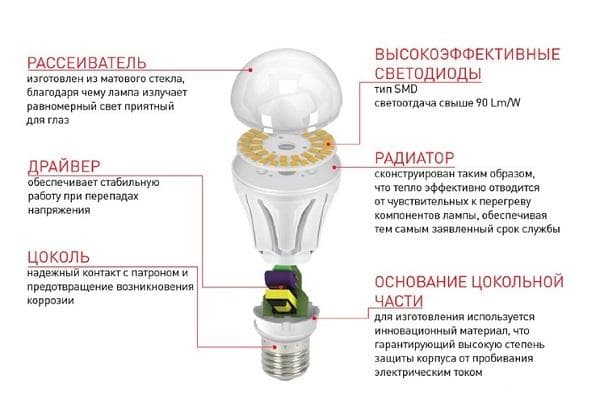
It is structured very simply:
Recovery
This video inspired me to make my own light bulb:
- We find a burnt out LED (or several).
- They are usually marked with a black dot. In my case, the entire LED was burnt out.
- We paint out the fire victim with a knife or screwdriver.
- We drip flux onto the exposed contact and apply a drop of solder.
This way we restore the circuit and the light bulb starts working again. But! There's one catch. The voltage then increases and the LEDs will light up one after the other. Perhaps the light bulb will work for another month. Or maybe just one day.
Current reduction
In order for the light bulb to work as long as possible, you need to reduce the current. For this:
- We take the driver and determine the type of chip.
- We are looking for a description on the datasheet.
- We solder a low-resistance resistor with a high resistance.
After this, the current will decrease almost by half. Yes, the light bulb will stop shining as brightly as before. But it will definitely last longer (maybe even 10 years).
Brightening Up
At the stage of replacing the resistor, one could stop - put the lamp back together, glue (tape) the diffuser... But the light seemed not bright enough to me. The question was how to fix this. I took the simplest route.
To increase the brightness of the light bulb, I took an old CD. I modified it a little and got a powerful reflector.
- Widened the central hole of the disk. To do this, I used a 35-point carpenter's pen. You can cut a hole with any other handy tool.Not the point.
- I glued the board with LEDs to the disk. I took hot glue. I spread it on the reflective side of the CD (around the hole). I pressed the board with its back.
- I reassembled the light bulb in reverse order. Where necessary, we solder the contacts. We do not change places of wires, even if the length allows. The light will flicker.
- I taped the seam where the case meets the CD so that the structure is strong and does not fall apart. The diffuser was thrown away.
Bottom line. A non-working LED light bulb turned into a kind of mini-spotlight. It’s uncomfortable to look at, but the garage is 200% illuminated! Of course, this option is not suitable for home. As well as for the street (damp rooms). There, brightness will have to be sacrificed for the sake of aesthetics and safety.
I foresee that many will say, why bother repairing and extending the life of LED lamps? Today the price for them is very affordable. Everyone can afford to throw away the old one and buy a new one. But out of principle, I decided to get the most out of it. I am one hundred percent satisfied with the result. The garage is as bright as day. In 3 years not a single LED has burned out. The lamp has become twice as bright and lasts three times longer (and this is not the limit)!


“low resistance resistor with high resistance” what is it??? So is the resistance low or high???
It’s just that the low-resistance resistor resisted a lot :)
Illiterate mediocrity, low resistance, he’s the only one there, but install it with more resistance...
The author, of course, is an enthusiastic dreamer, but his options are acceptable.
just one resistor with a higher resistance, and the other with a smaller one. like 5.6 ohm to 3.3 ohm.
Again Om messed up and didn’t add more oms.
Isn’t it possible to solder in a suitable resistance instead of a burnt-out LED, thus restoring the circuit and not loading other LEDs???
If there are two of them (resistors) this is usually the case. But I remove with less resistance. It works out well. They work for several years.
but 8 times less light (light flux)
Great article. Especially for pre-retirees. When there is no work and no pension. We will repair it, since we have nothing to buy it with. Including computers and televisions. The only thing is that I already have more than 40 varieties of LEDs in my collection. But it doesn't bother me.
Wow, how can you spend an evening on a light bulb that costs 40 rubles, and isn’t it easier to buy? Spend the remaining time with my wife
where is it 40? in Kuzbass we have 240 or even more
And the next one for 40 rubles will burn out in two months, but here the service life will extend
fuck you 150-300 rubles
You're a buffoon, not Nikolai: a lamp starts at 90 rubles, you still have to buy it, and not everyone has ceilings of 2.10, mine is 3.30, and why do you have to constantly change the climb?
It’s better to fix 10 light bulbs than to spend the evening with your wife...
I repaired several light bulbs by soldering the contacts of a remote LED. Indeed, it takes minutes. But a couple of burnt-out light bulbs have all the LEDs in order, I couldn’t identify the burnt-out ones. Throw it away?
Even if you bridge a burnt-out LED, nothing bad will happen, the voltage will not increase on the LED, since the driver supports CURRENT, NOT Voltage, in the LED power circuit, if it is a high-quality light bulb and not a fake, made so that it works at least a little, so that have time to sell it
So, high-quality lamps cost well, but they also work out their price. They've already been working for me for 4-5 years. Initially, I didn’t take the cheap ones. And the 20 W floodlights in the garage have been working for seven years. In 2013, he charged 2,400 apiece, and China cost 400-600 rubles. On Chinese ones, after 4 hours of work, you can fry eggs, but mine are a little warm and shine brighter than one and a half times 2600 lumens. The neighbors have already thrown out more than one Chinese, they work for a year at best and are thrown into the trash.
It will shine brighter! There will be fewer lumens! They just collected the light like a mirror in one direction. It will become brighter in front. But there will be no light at all from behind.
Did you glue a piece of CD disc onto the radiator using hot glue? Like the radiator is always cold.
I wish I could post a photo of the lamps with the disc.
yes there are some, look
It’s not the bad light bulbs that they sell, but the quality of the power supply is “g-o”, they burn due to voltage surges. I installed a stabilizer at the input and completely forgot what a lamp was.
nope, everything is done specially, the power supply is placed at the bottom to heat all the boards, the transans at the top so that it falls and breaks everything
I would tuck the tip of the soldering iron as normal. It’s disgusting to look at something like that, let alone work like that
We unsolder a low-resistance resistor with a high resistance. Another Dimka Kopeikin has eaten!
The guy wrote everything correctly, no need to be funny! There are 2 resistors, remove one of them and the light bulb will last longer.
You can do it simpler, if the light is weak, then remove the diffuser and glue a flat transparent frosted glass; the light output will double and the light bulb will be smaller
To tinker with a light bulb, waste time and even discuss it... That’s where we get imbalances in the economy, in politics, in healthcare! Madhouse.
Well, what does politics, economics, and health care have to do with it?
GREEDY PAY TWICE!
Explain:
Low resistance high resistance?
Is it like falling upward?
LED lamps have a YEAR warranty. It will burn if you go and change it at the place of purchase. That's all the repairs.
Okay, I’m not very familiar with resistors and diodes, but I would really like to see how he increased the brightness of the lamp. I glued the board onto a CD, what has changed there if the board occupies the entire surface (entire area) of the cut-out CD blank?
Repair cheap light bulbs?? Yes! There is no limit to idiocy! Although on the other hand, if you have nothing else to do in life, then why not.
I know one idiot who has been repairing and upgrading his power amplifier for 15 years. I look at him with pity, he probably fancies himself a Great Inventor!
It's better than sitting on a smartphone or playing until you turn gray.A person gains knowledge and ability to work with electronics. Some like a hobby, and some will invent. The best electronic engineers are former radio amateurs
A reflector made from a CD will serve as the same one.
Second Companion
And a new diode instead of a burnt one is no easier. On AliExpress they cost pennies
The dude said about a low-resistance resistor with a higher resistance, emphasis on O! Of the two, I chose the one with the greater resistance. It turned out to be a pun, if the emphasis was placed incorrectly on the word “big”.
He also experimented. A simple lazy way to make a night light out of it: disassemble it without soldering anything, graphite the burnt part with a simple pencil and voila.
Oh, I repeat myself?
Even if the lamp costs 60 ₽ (although it’s already on sale), the work will only take 10 minutes, and then simple arithmetic: - 60 X 6 X 7 = 2520 ₽ per day. Not everyone outside the Moscow Ring Road can earn that much. Of course, if your hands grow from another place, then it’s easier to buy and not waste precious 10 minutes during which you can drink a beer.
I didn’t even bother to read this blizzard. I just solder a 2 W resistor at 300 Ohm in parallel to the burnt out LED and that’s it.
I just solder a 2 W resistor at 300 Ohm in parallel to the burnt out LED and that’s it. Everything is very simple.
I'm tired of buying these supposedly energy-saving light bulbs. I spent so much on them, but they only last a month at most. ⚡⚡⚡
The only way is to replace the LED with an identical new one. Remember! If the LEDs are assembled in series, then any change in the resistance of one of them will affect the viability of the others, because, as the author only correctly noted, they really work to the limit. It will not be possible to change the driver output voltage at all, becauseit delivers the required current to the calculated resistance of the LED chain, regardless of the mains voltage within the range of 160-270 volts. Only completely replacing the driver with another one will help. A tip is to buy light bulbs with a two-year warranty rather than a one-year one. One year warranty is the responsibility of the manufacturer, and two years is a voluntary gesture!
To extend the service life, you can do this: In the diffuser at the border with the body, using a soldering iron, several holes are burned in a circle with small increments. In the upper (lower) part of the diffuser, depending on how the lamp is located in the lamp, several holes are also burned. Using a soldering iron, trapezoidal windows are melted along the body of the light bulb to the metal of the radiator and the plastic is removed from them. Don't forget to leave a few jumpers between the diffuser and the base for strength. Plastic overhangs can be easily cut off with a knife.
With this modification, the temperature of the LEDs decreases and, as a result, the service life of the bulbs increases.
excellent1 space for experiments. who understands. there’s already enough trash to throw away, learn
LEARN. and there is already enough garbage to throw away.
I salute those who do something with their own hands and there is no need to envy: